Hi All! Happy Thanksgiving a few days early! I hope you all have a wonderful week, take time to thank God for the many blessing He has given to you, and enjoy laughing until it hurts with your family. If you’re like me, you’ll be out in the craziness of Black Friday. Not necessarily to buy much, but DEFINITELY to enjoy the experience.
Say a prayer for us today, we’re headed in to have tubes put in Josh’s ears. He has hearing loss and we have been working with the ENT for 6 months. Now it’s time to try tubes to see if they do the trick. I know it’s a very minor surgery, but it makes a mommy nervous. :)
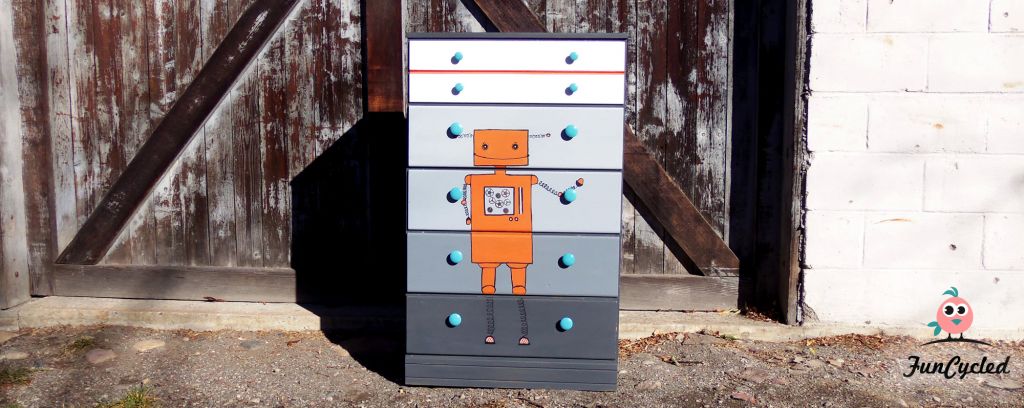
On to the furniture… I know, I know. You all know how I like to chat with you though. ;) So, my pal Mo… or should I call her “that girl!” hooked me up and told my friend Petra about her family’s yard sale. Petra said “hold all the furniture for Sarah” and off I went. This was one of the pieces we picked up that day. I think you’ll be happy with the results. My sister Sarah… yes, I have a sister named Sarah. It’s not a joke; she came to live with us when she was 4 so mom and dad couldn’t really change her name at that point. ;) She asked me to make a robot dresser for her son, Calvin. Um… yes please!!! The best part was… she gave me free reign to do whatever I wanted. Yippee Skip-pee!

I bought Annie Sloan’s graphite grey chalk paint and tried it on this dresser. It’s the first paint that I’ve bought from her. To be honest, I didn’t think it covered as well as I anticipated. With all the rave reviews out there, I just expected a bit more. I started by removing all the knobs, lightly sanding the whole piece and then hand painted the dark grey. I then did a gradient or “ombre” from white to grey. I have seen this done, but it didn’t go that easily for me. This is definitely the longest dresser project so far. After redoing the ombre twice because the gradient wasn’t gradual enough for me the first time, I was happy with it.
Please forgive the no in-between pictures. I took them on my iPhone and some how they are lost now. Grrr! So, I went to Home Depot and bought a sample of a orange that I liked. I made this little guy up from different ideas online. Nothing was like exactly what I wanted, I thought most of the robots looked too “adultish” or had round heads. So I kind of made this design up. I hand drew it and then used painters tape to make the body and head square. After I did all of that, I (and my kiddos) painted the body three times. Then I used a black painters marker to draw the black lines.
It still needed something so I went and bought some fun gears to put in his chest. I really feel like that topped the cuteness chart on this piece. After everything had dried for a few days, I waxed it all to seal it.
Last but not least?? Teal knobs of course!!! And that makes me love you little robot dresser. Now every time we see a robot in the store, my son asks if we can buy it for Calvin. So cute!
About time for the after pictures? I thought so! Here you are!


Have a great week and happy redesigns,
Sarah
PS- If you want to stay “in the know” please like our Facebook page: https://www.facebook.com/funcycled You’ll see designs from the people who inspire me, be the first to know when new pieces are available, and just enjoy life with us! Get each of our new projects emailed to you when you enter your email address in the box at the top right side of this page.
“Trust in the LORD with all your heart, And lean not on your own understanding; In all your ways acknowledge Him, And He shall direct your paths.” (Proverbs 3:5-6)