A custom furniture request came in from our fan, Theresa, who was looking for something special for her nursery decor. Theresa and her husband are keeping the gender of their soon-to-be-arriving miracle a surprise so she wanted to go with something neutral. She gave me the size she wanted and let me go to town finding what would work. I found the perfect size and style within a couple days, I take that as an answer to prayer. ;) I quickly went to go pick up this beautiful antique and was planning to paint it in a shabby chic white. I was literally getting into my van after buying the dresser and I had a note from Theresa asking what I thought of Chevron. What do I think of Chevron?? By golly, I own Chevron shoes! I LOVE Chevron.
So, here she is before…. (and no, this isn’t at my house, it was where I picked her up). ;)
![]()
First I painted the dresser using a white Behr satin paint. If you want to see how we paint solid color dressers, see our post How To Paint Furniture. Last time I wrote a post on How to Paint a Chevron Dresser, I used a template to draw out the Chevron and then hand painted them. That worked out ok, but the lines weren’t as crisp as I wanted them to be and the paint was blotchy in spots. For this dresser I wanted to try a new way to paint Chevron stripes.
First, you want to grab your measuring tape. You’ll need it a lot anytime you are going to be painting Chevron stripes. Start by dividing each drawer in half and drawing a line down the middle of each drawer using a pencil. Then, pick the angle that you like best. I started with the middle drawer and picked the angle of the V that I wanted to make. From there, mark two inches higher on the dresser and then use paint’s tape to make the next V. Continue that pattern until all of the drawers are done.
![]()
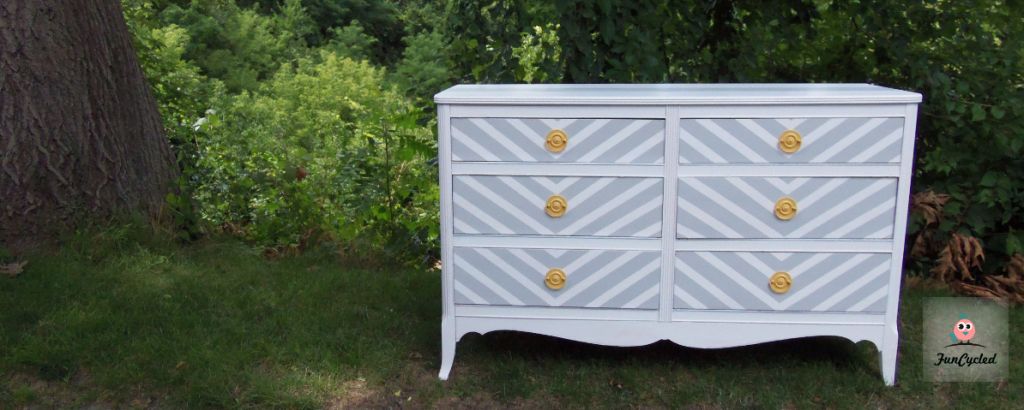
Since I painted this dresser white, I painted over the tape using the same white paint to ensure I would get crisp, clean stripes when I pulled away the painters tape. Let the white paint dry and then paint the drawers (I used Benjamin Moore’s Richmond Grey because that was the color of the walls in the bedroom and Theresa wanted it to match). When I first painted the grey it looked almost white and I was nervous that the difference would be too subtle. I couldn’t be more wrong… I definitely think the two colors are a beautiful compliment to each other.

Two other changes to the original plan. I thought it could use a grey stripe along the top, just to give it a modern feel. Also, we were going to paint the knobs white, but I asked Theresa if I could paint them yellow instead. Yellow is gender neutral, right?? But of course!! She was such a delight to work with… a really good sport! On both accounts she said, I trust you, if you like it, do it!! Wow! I love my job on days like that. :) Thank you so much, Theresa!!

After I finished this one, I had to call my sister, Sarah, (yes, her name is Sarah, too, we’re not crazy… she came to live with us when she was 4. Love her to death!) and tell her I may need to make another baby just so I can make another one of these dressers. If you like this design, you may also like our new Chevron Desk. Check it out!
If you want one like this, let me know and I’ll hunt one down for you and make her pretty! :) I hope you all have an awesome week and live each day to the fullest!
This design was featured on the Better After Blog.

Happy Redesigns,
Sarah
Remember… If you like what we’re doing, please like us on Facebook at: www.facebook.com/funcycled or share this on Pinterest! Also, you can now get each of our new projects emailed to you when you enter your email address in the box at the top right side of this page.

I LOVE the tutorials you post! I have a dresser I found at Goodwill that I’ve been hesitant to paint, but after seeing this I may have to give it a try! LOVE the colors and the Chevron! :)
Hi Nikki,
Thanks for checking out our site! I would love to see the before and after pictures from your project. Email them over to me when you’re done. I’m glad you have inspiration to try it!
Happy Redesigns,
Sarah
LOVE this, and thanks for the tutorial!
Thanks for stopping by, Trish!! :)
Wow, I LOVE THIS!!! Great job!
Thanks Allyson!
[…] did this one on FunCycled and has a great […]