Posted on

How to paint furniture with an aged pewter finish? – Tuesday’s Treasures

Hi Friends!

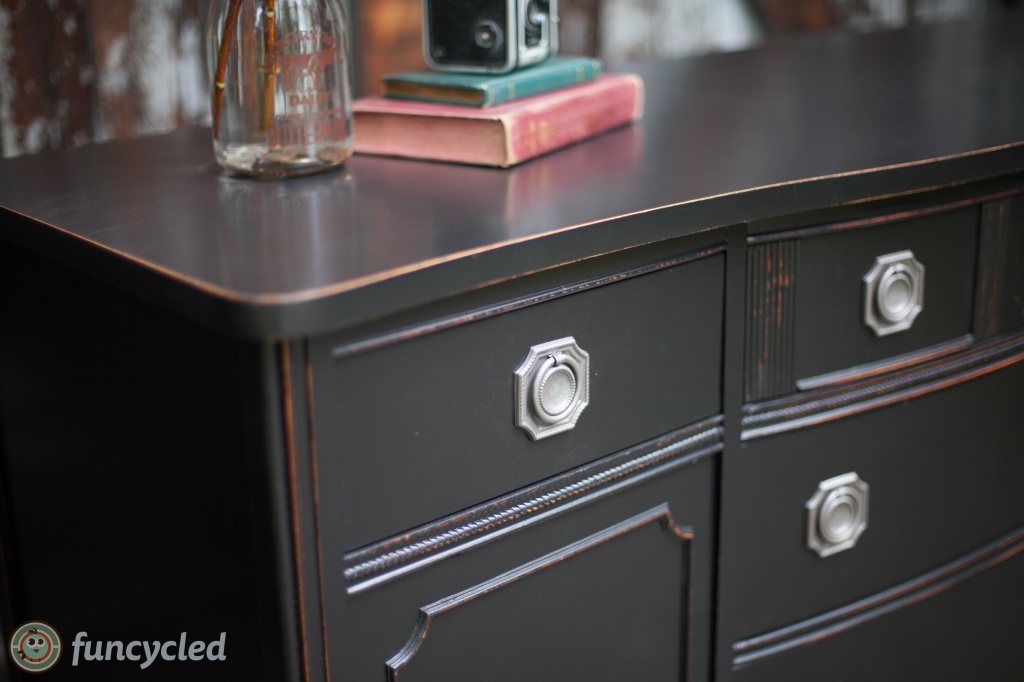
I’m coming to you today with a fun transformation in a finish that I’ve wanted to try for a very long time! Saying that a painting technique is a first for me after painting furniture for about 4 years feels weird. It was so much fun to create and have a challenge. I read all different tutorials and decided to use a few techniques from each that made sense to me.

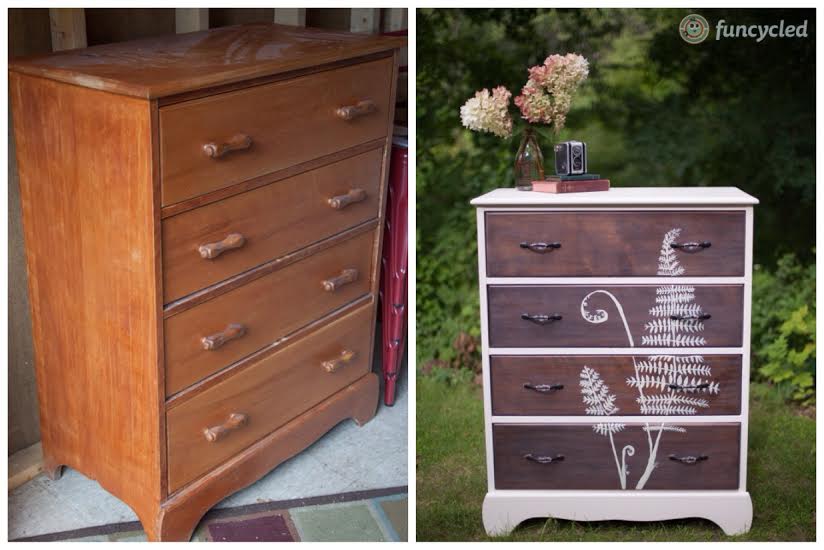
I took pictures of the steps of this makeover. Then this past week I forgot my phone was in my back pocket and dropped it in the toilet. I didn’t even know it dropped so I also peed on it and flushed it. TMI? Maybe. It made you laugh though, right? Smile? Anything?? You KNOW you did. Lol! Needless to say my phone had no more hope of coming back to life and I lost all of my photos. Sad day. I do have the before and after so we can talk about the in between steps, ok?
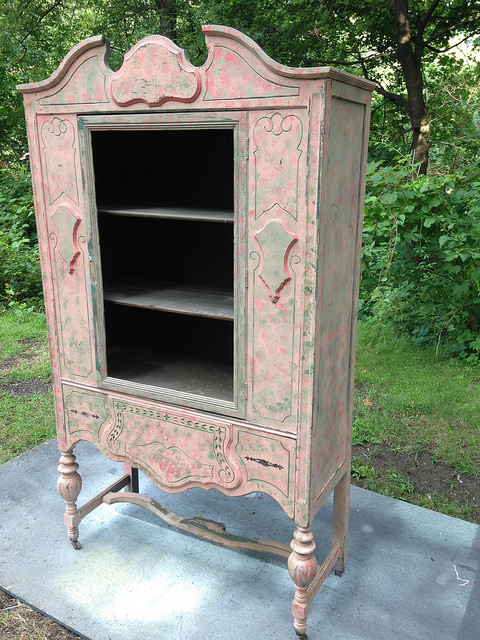
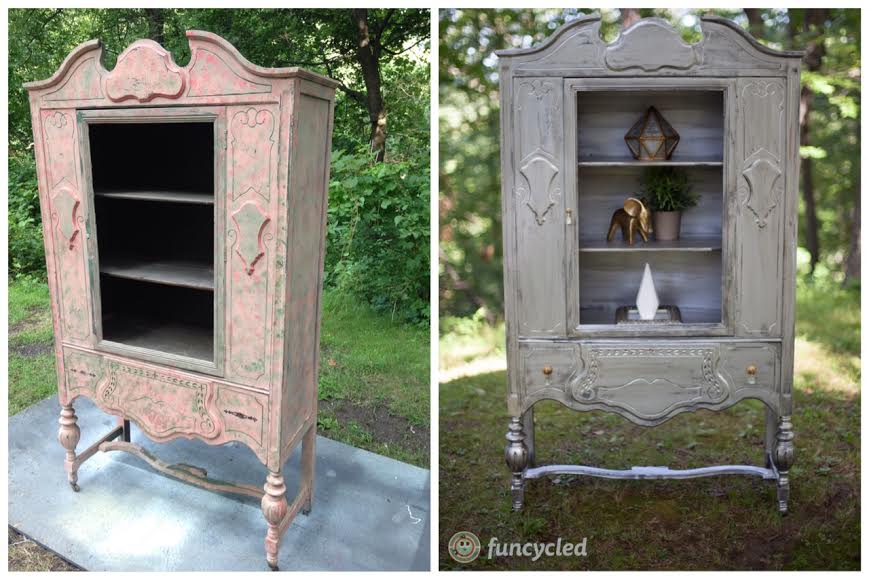
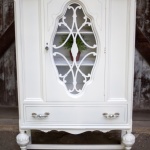
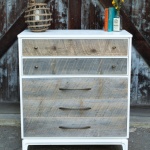
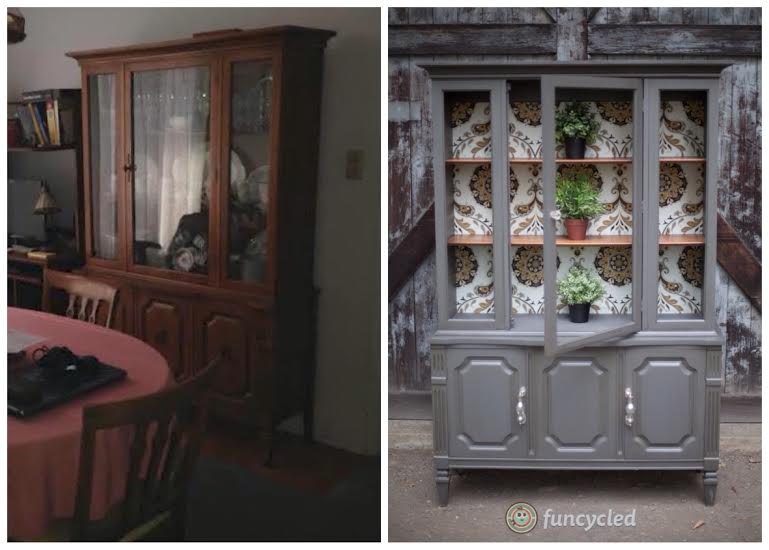
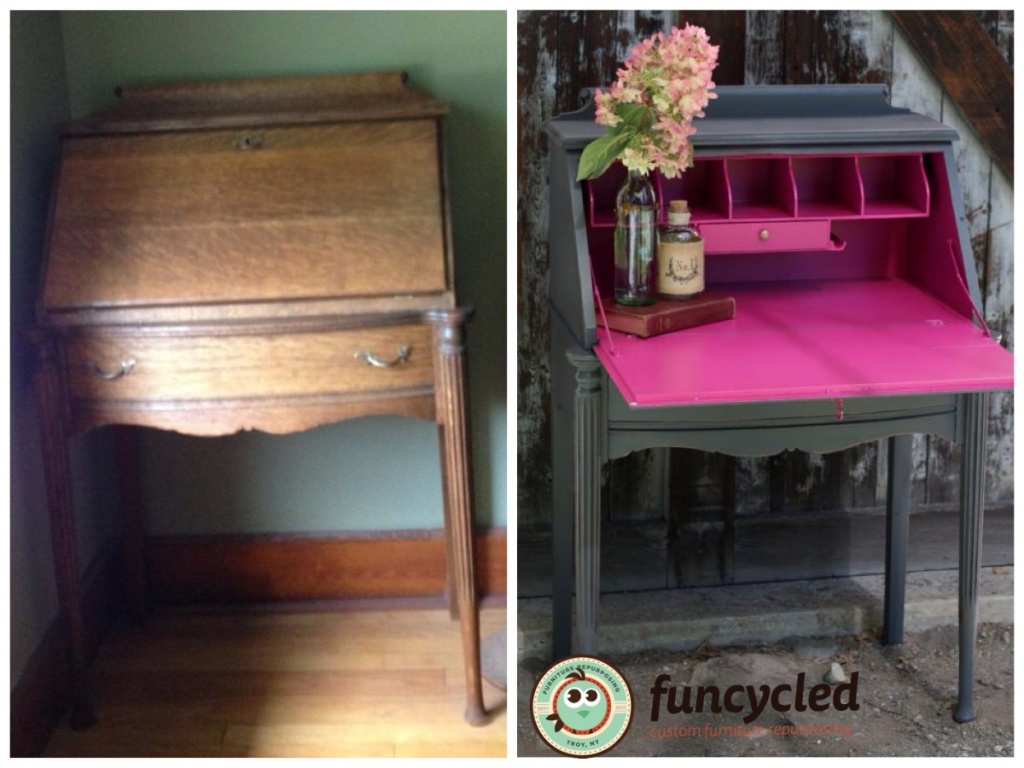
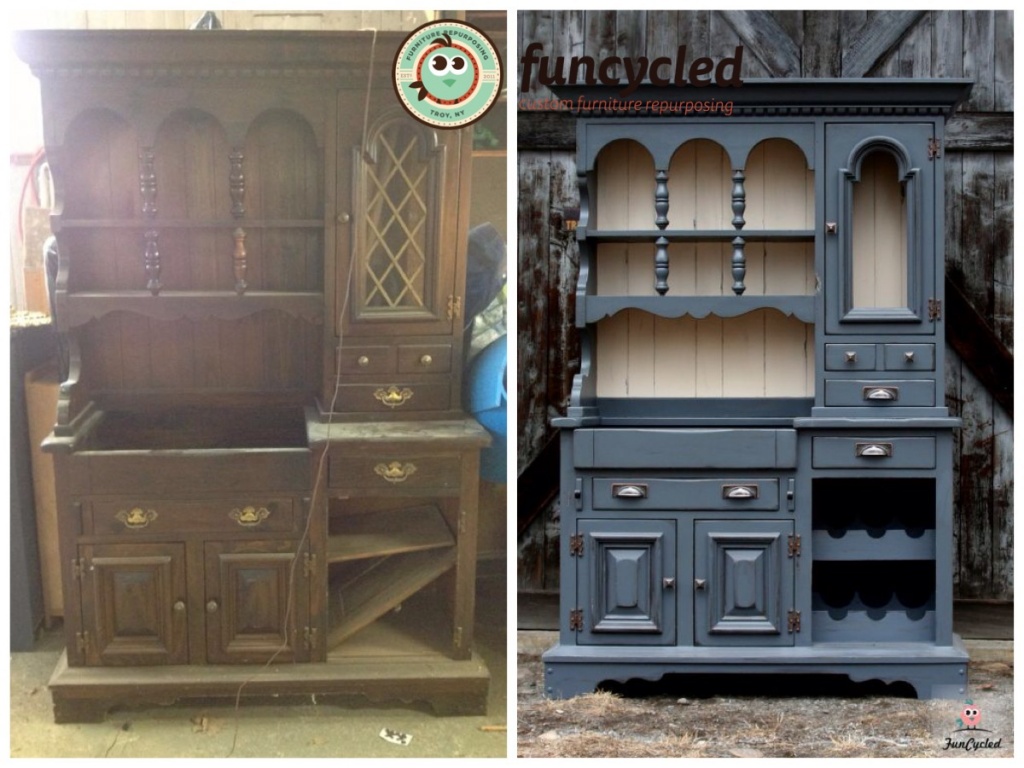
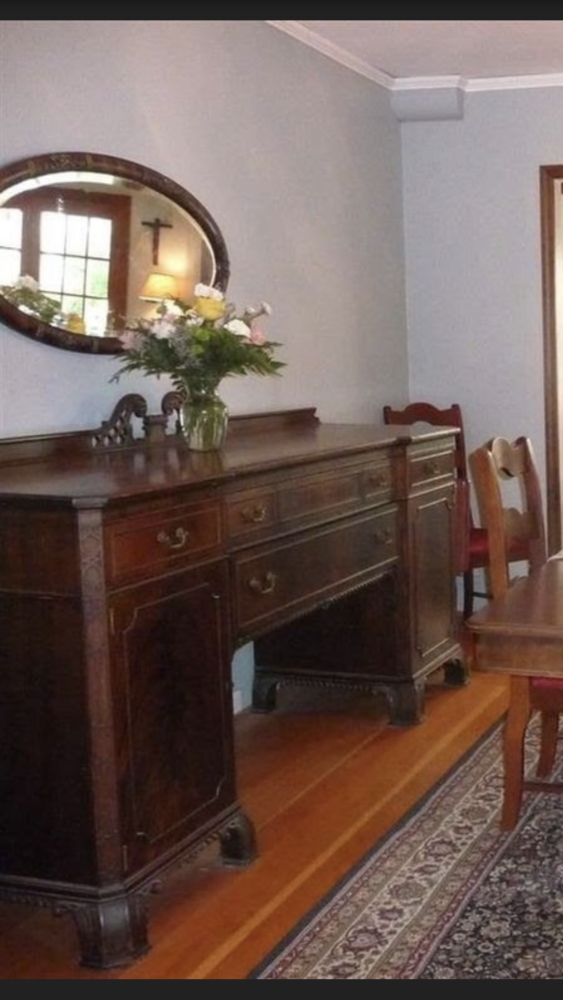
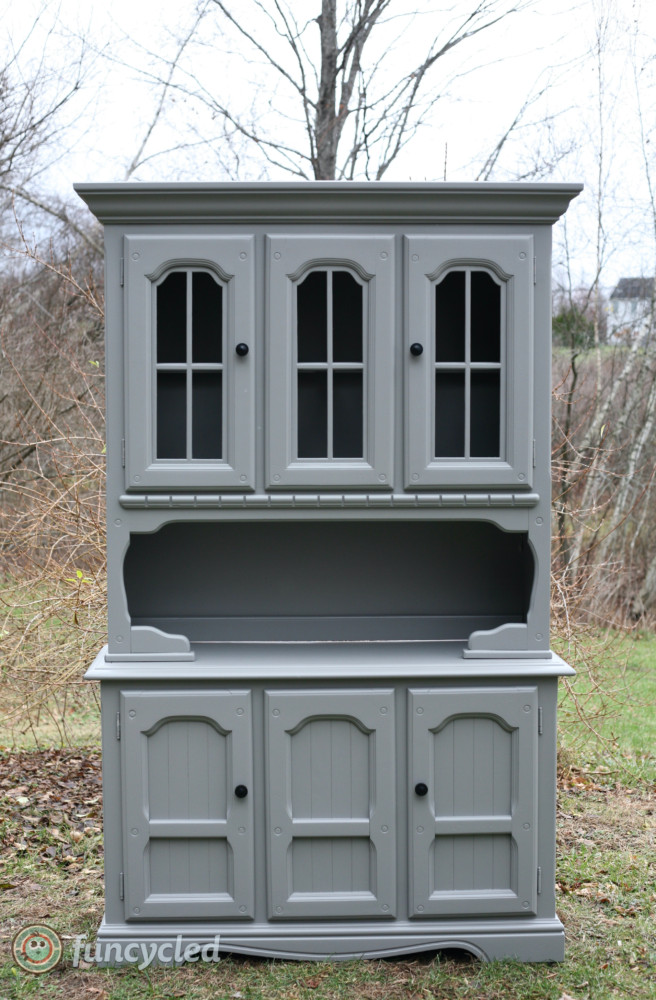
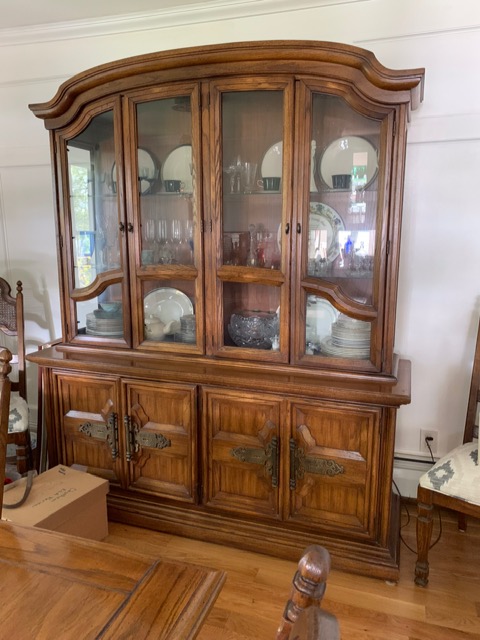
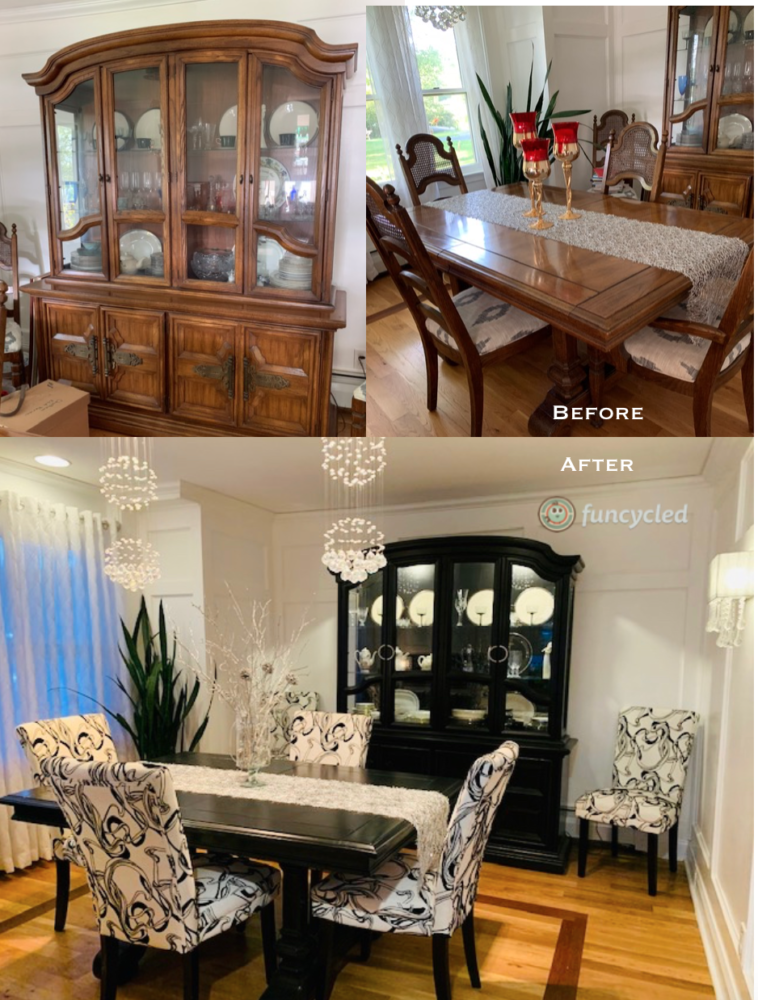
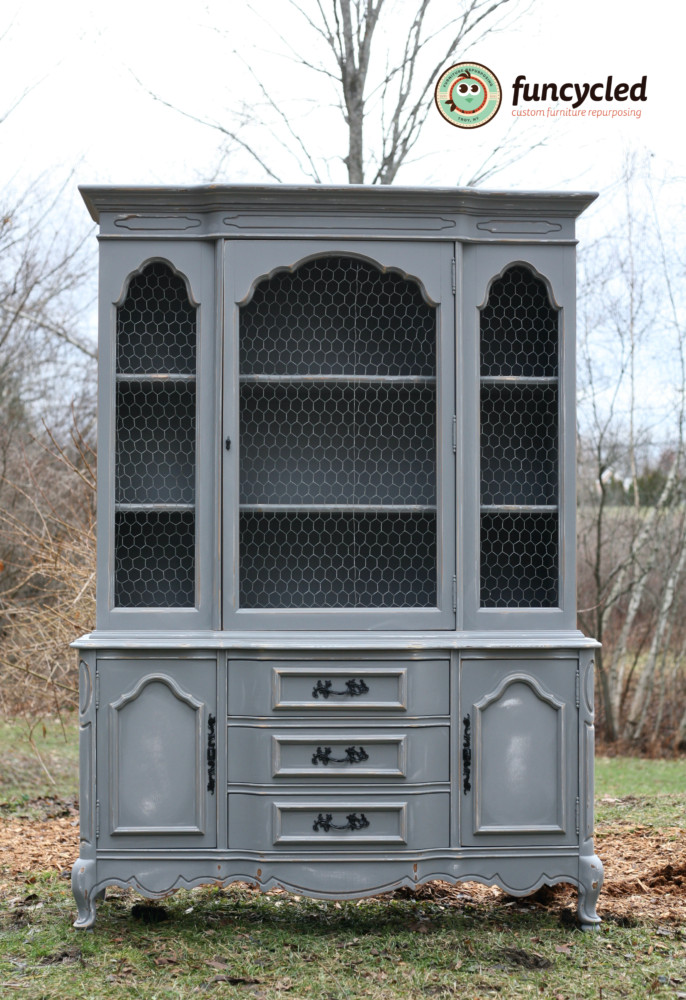
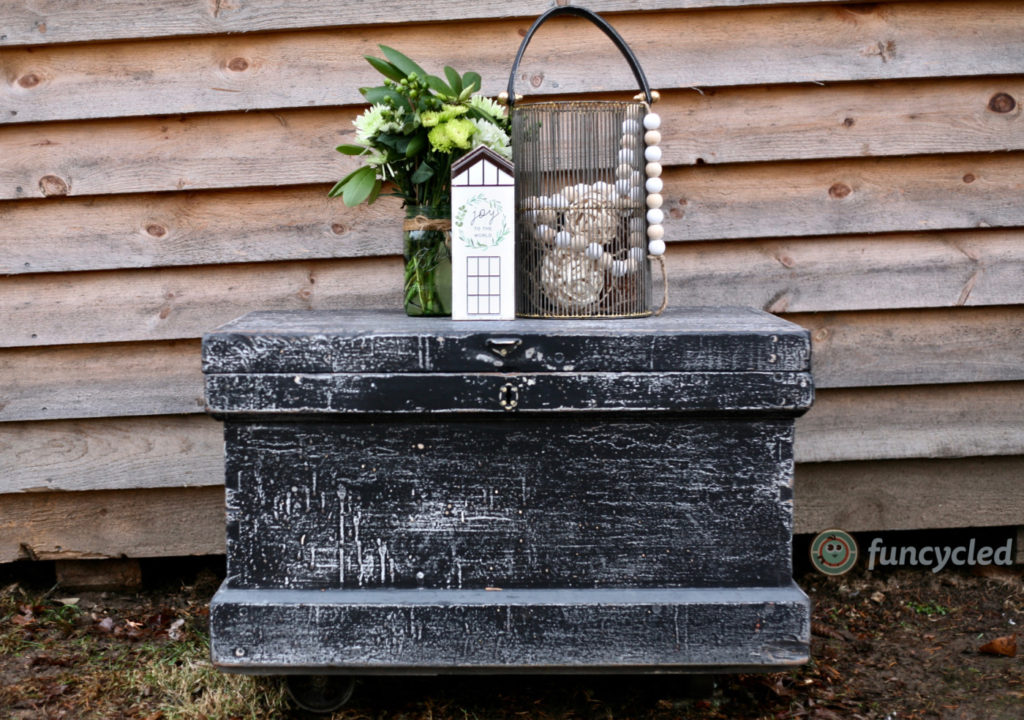
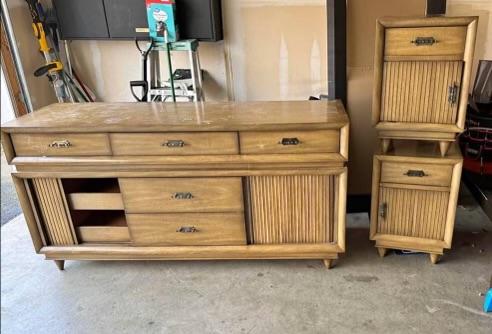
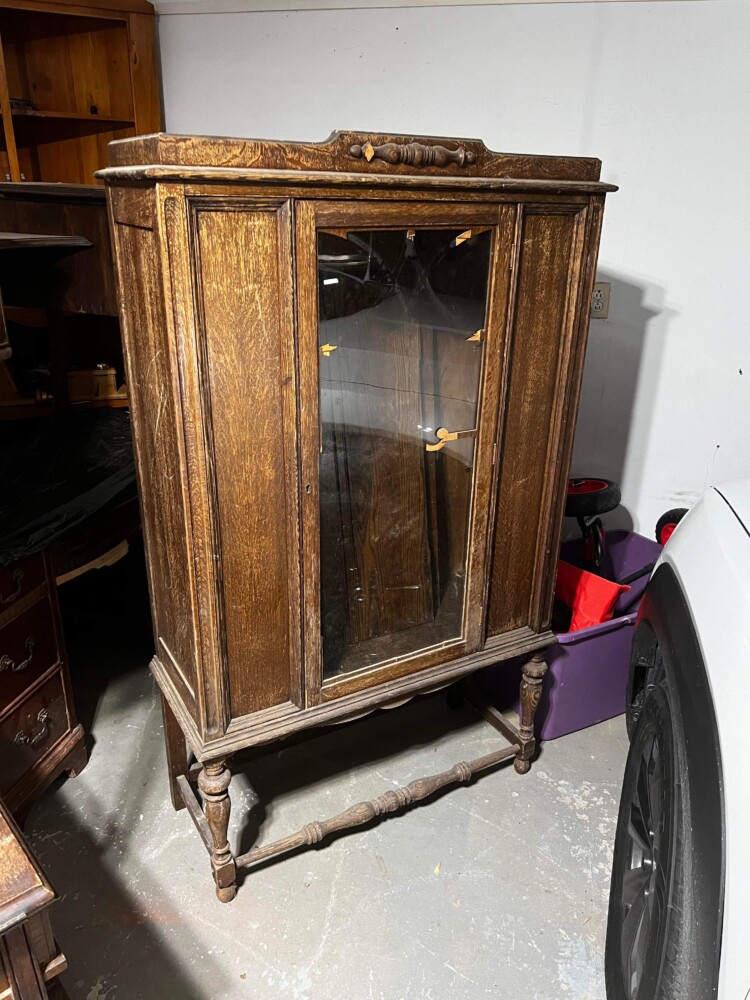
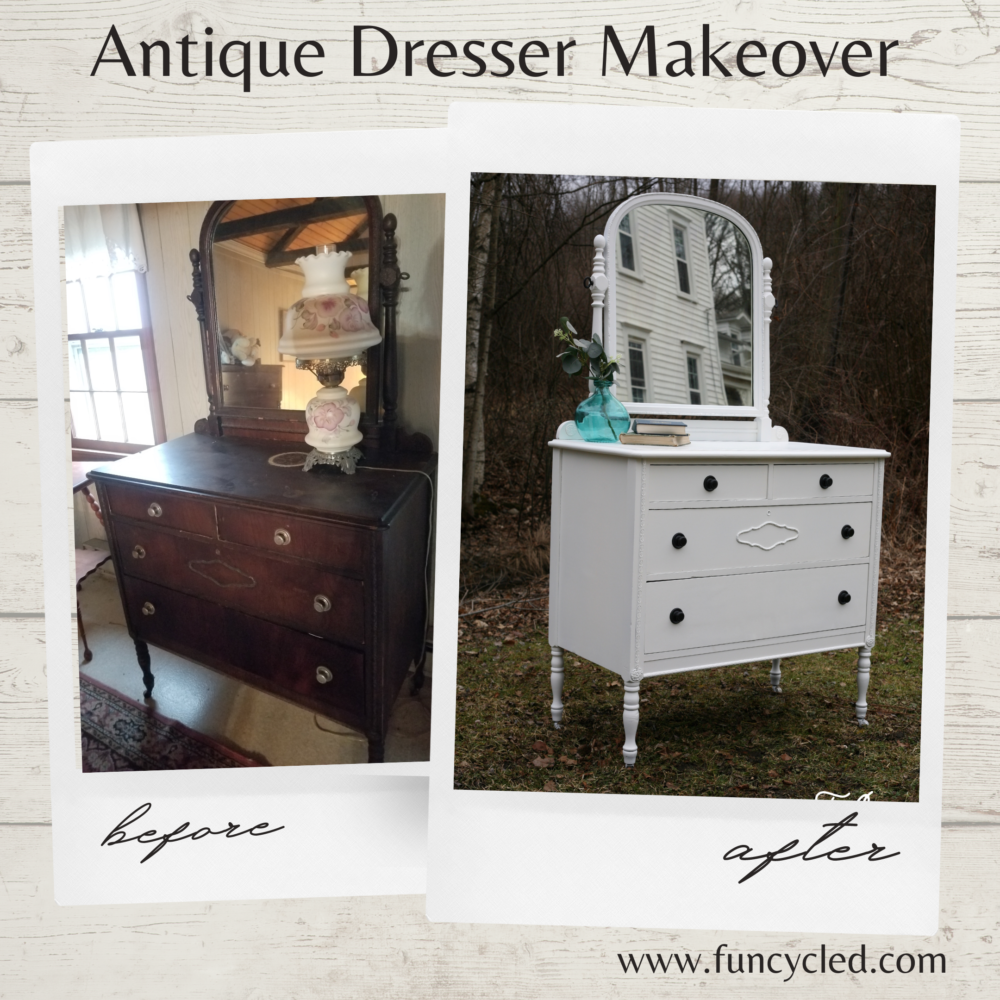
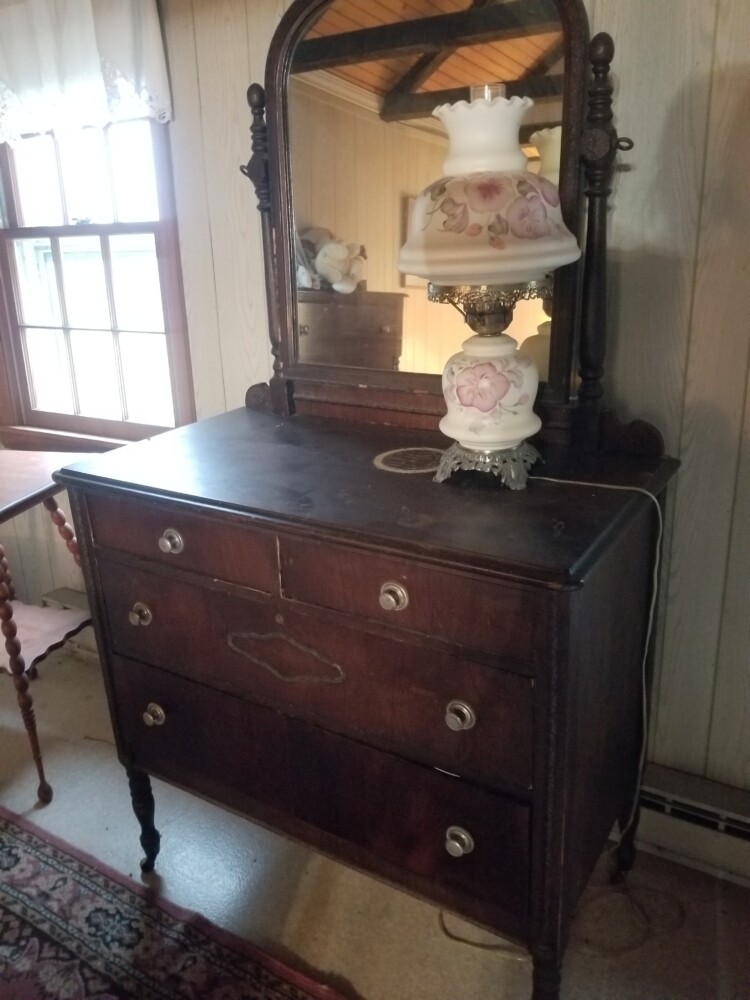
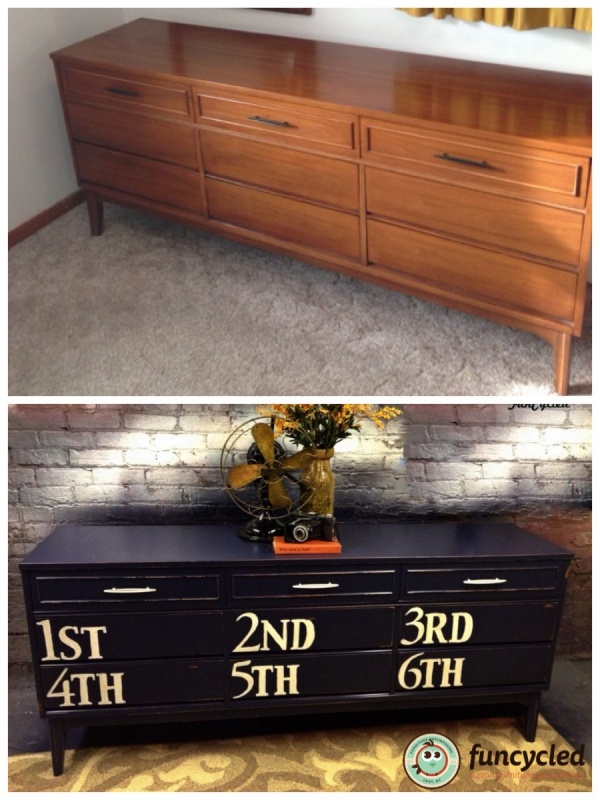
Here it is before:

new 236

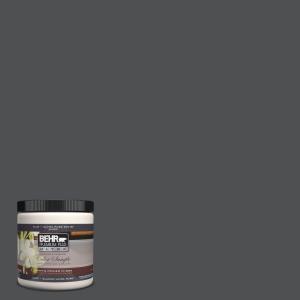
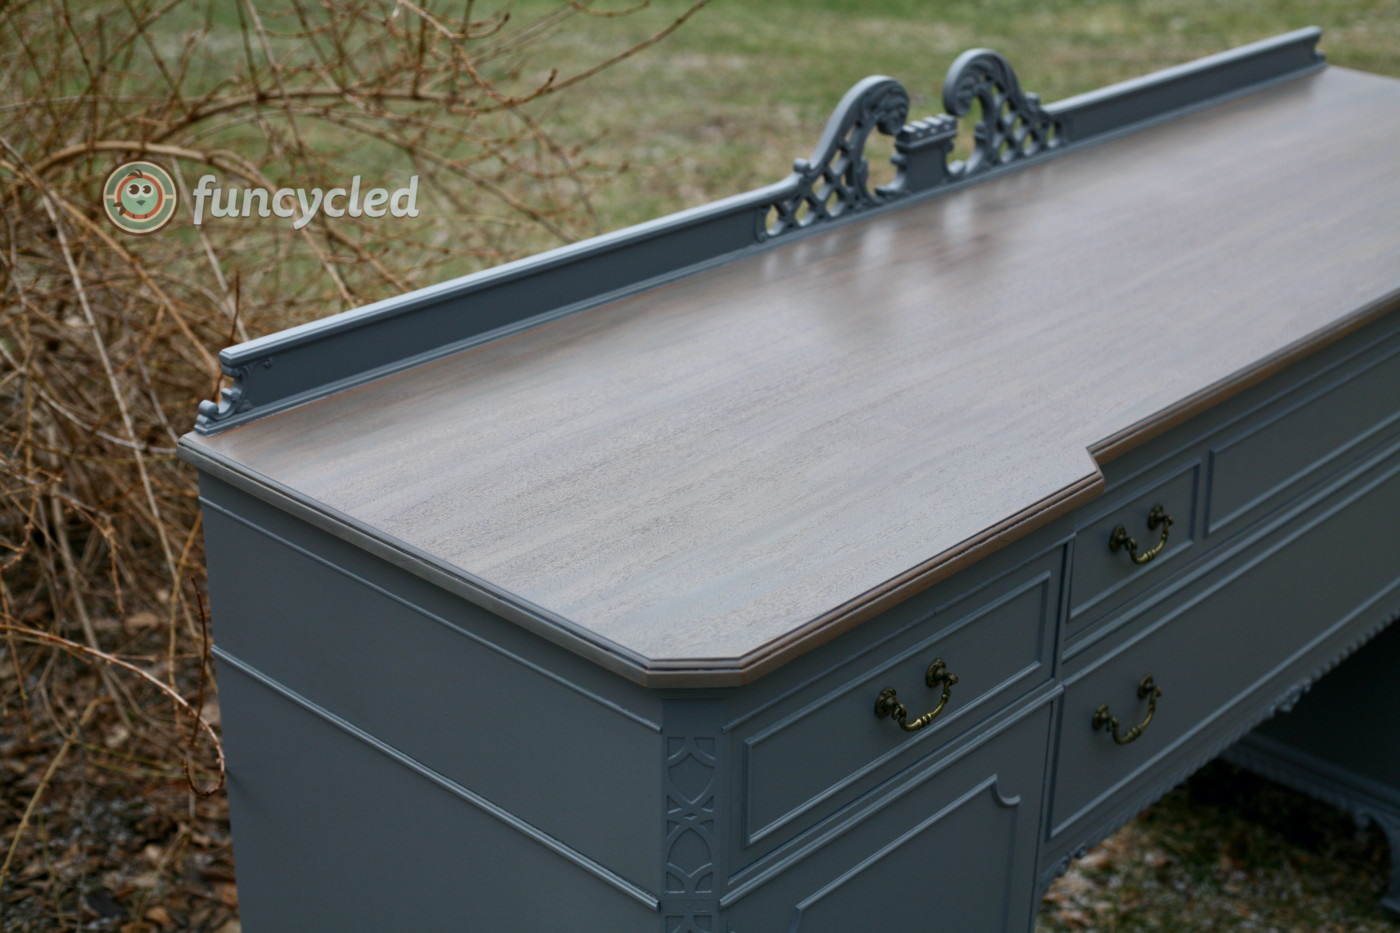
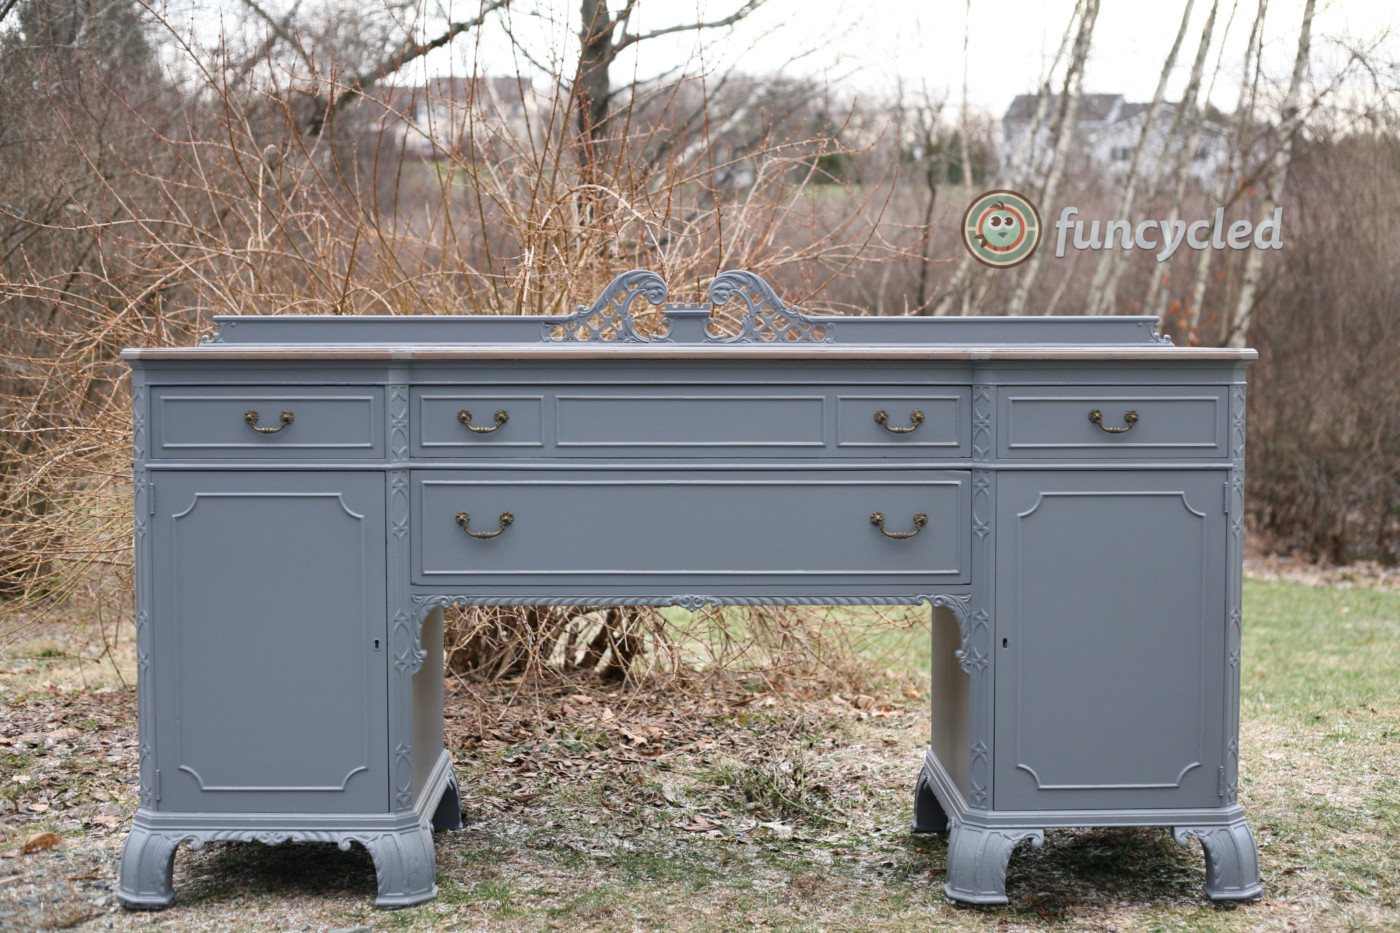
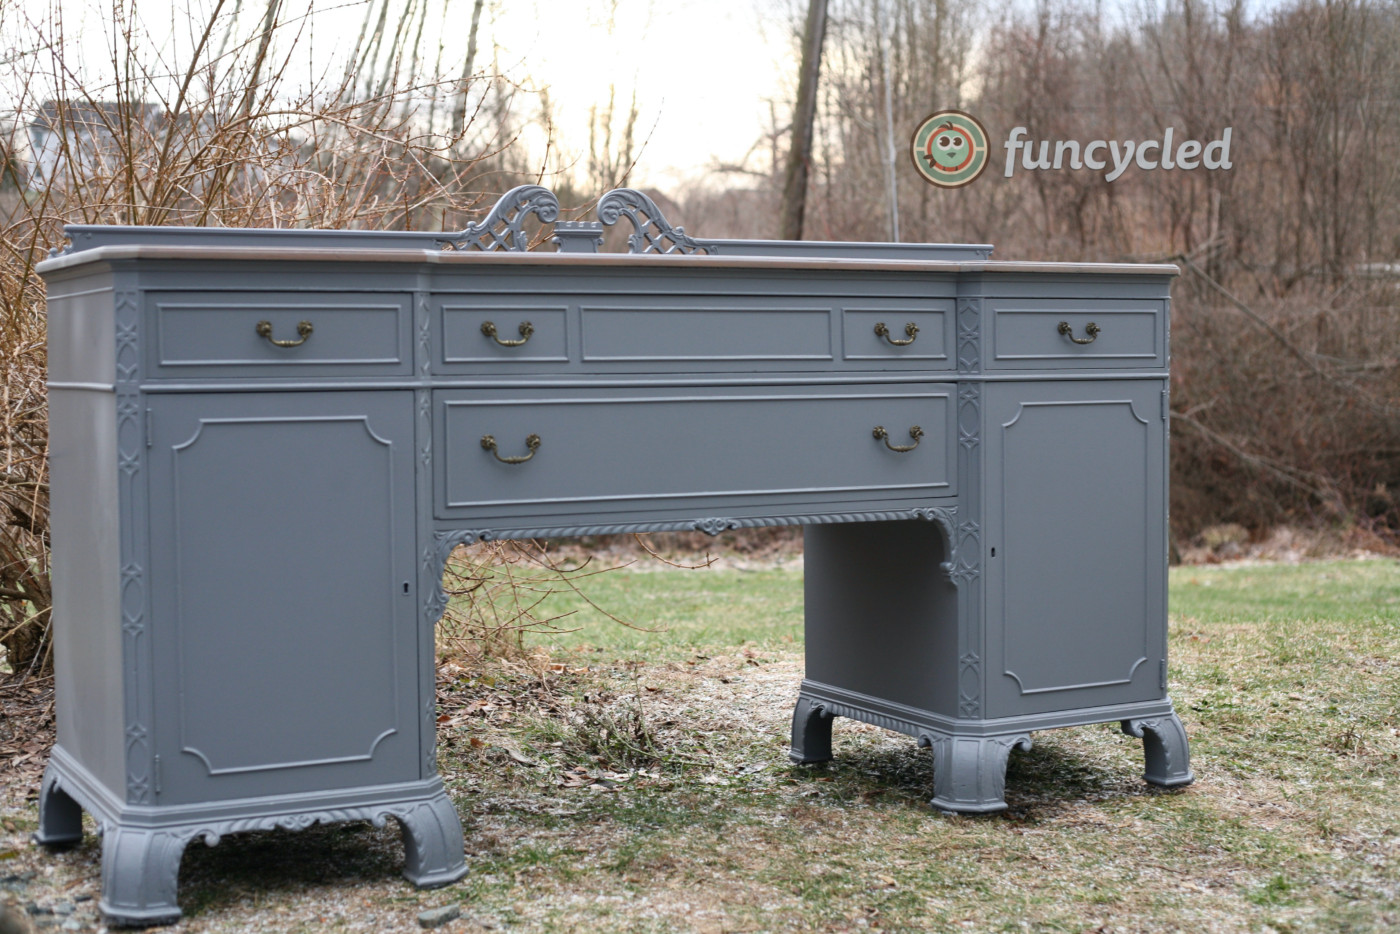
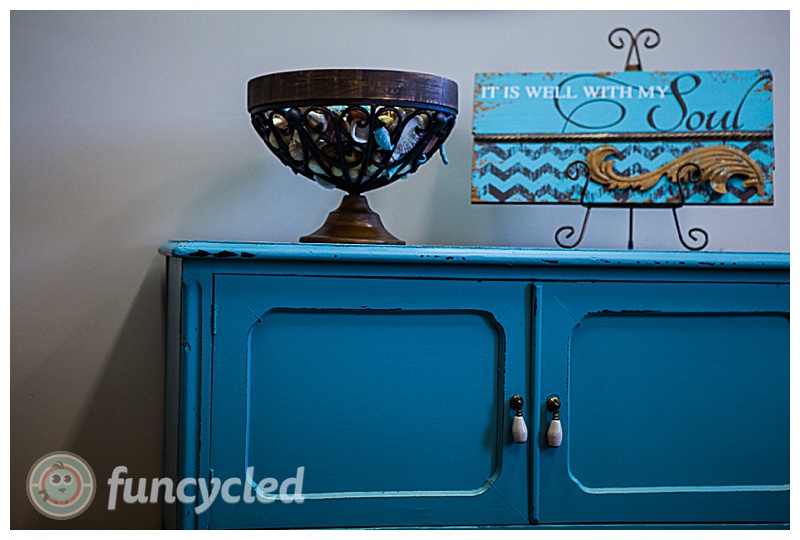
We sanded it down and painted it using Behr’s color Cracked Pepper.

behr cracked pepper
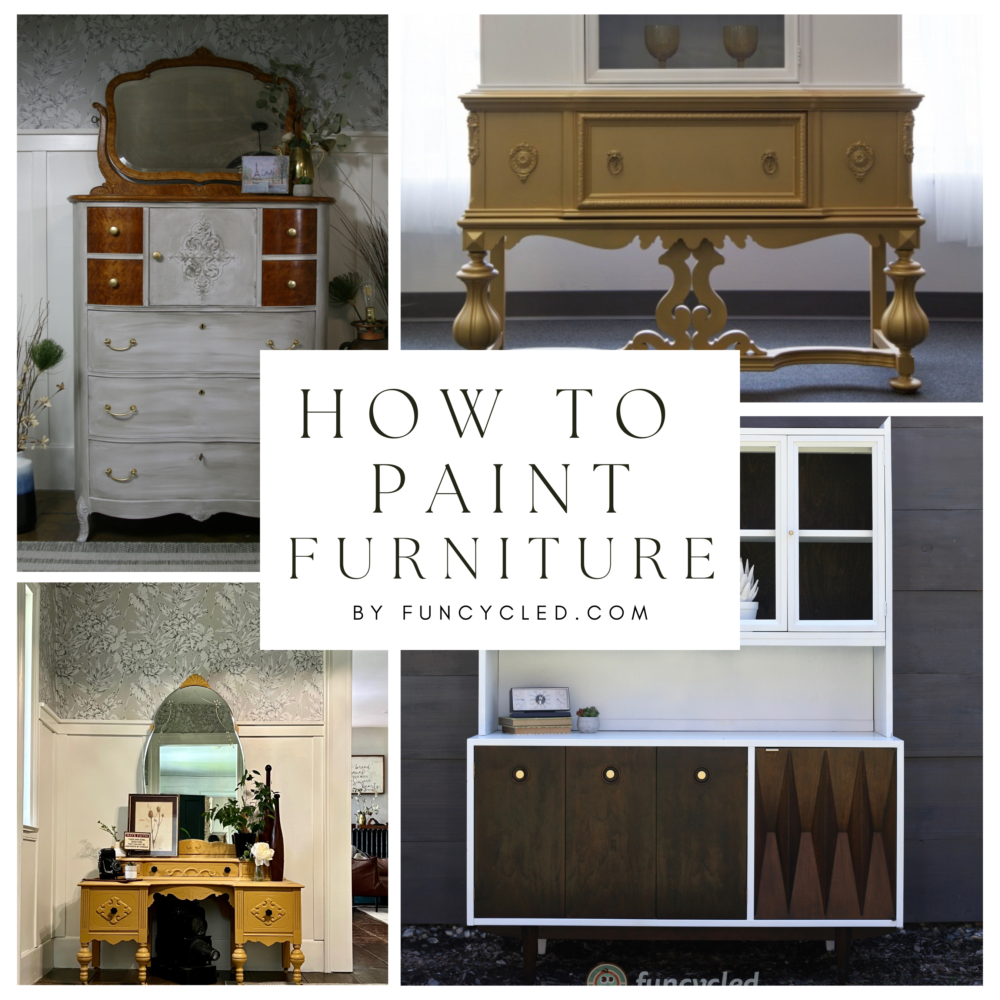
If you’d like to see how we paint furniture, check out our How To Paint Furniture post.
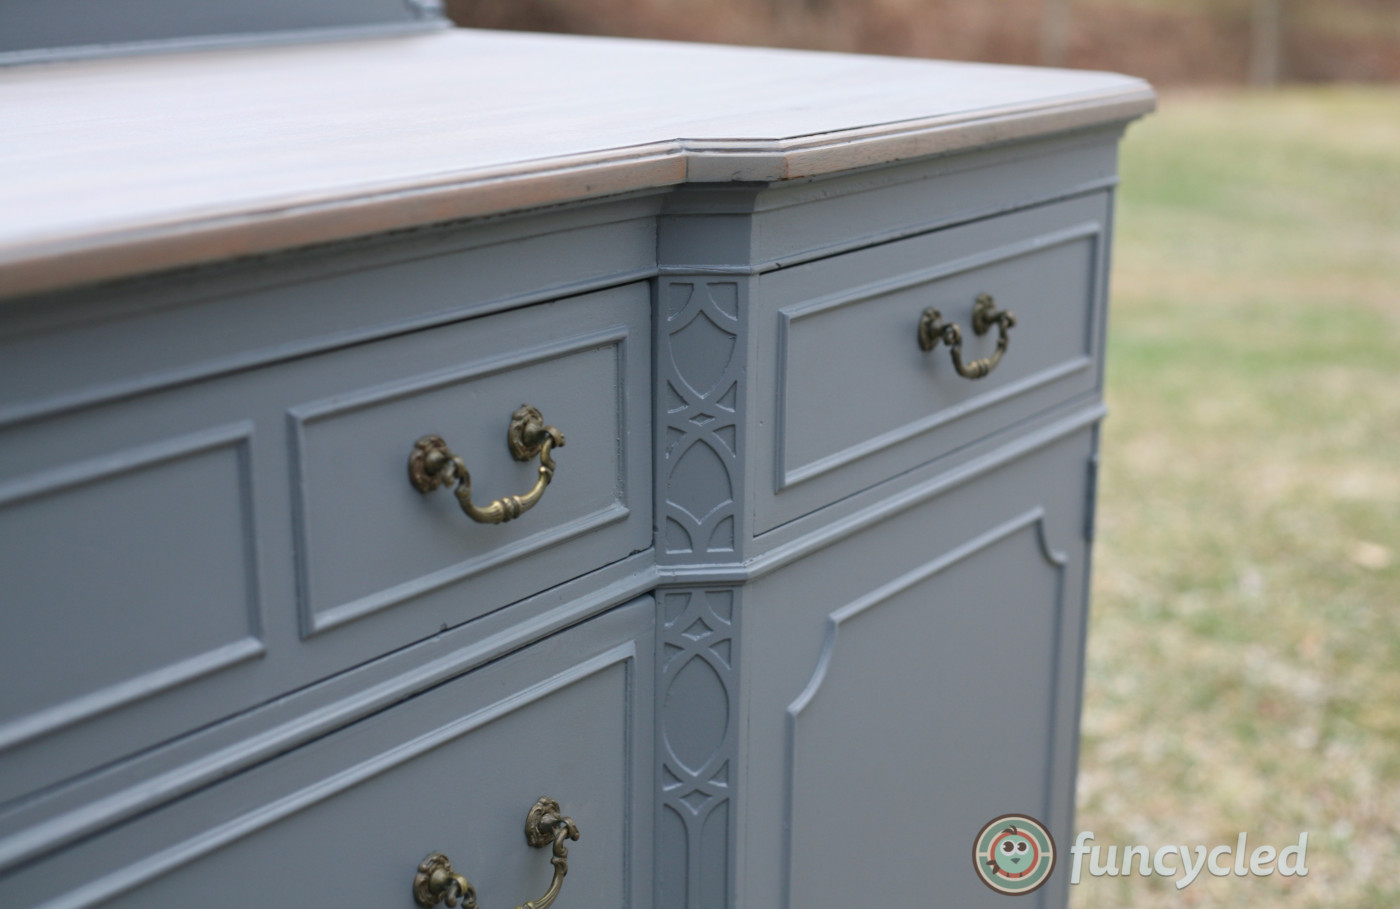
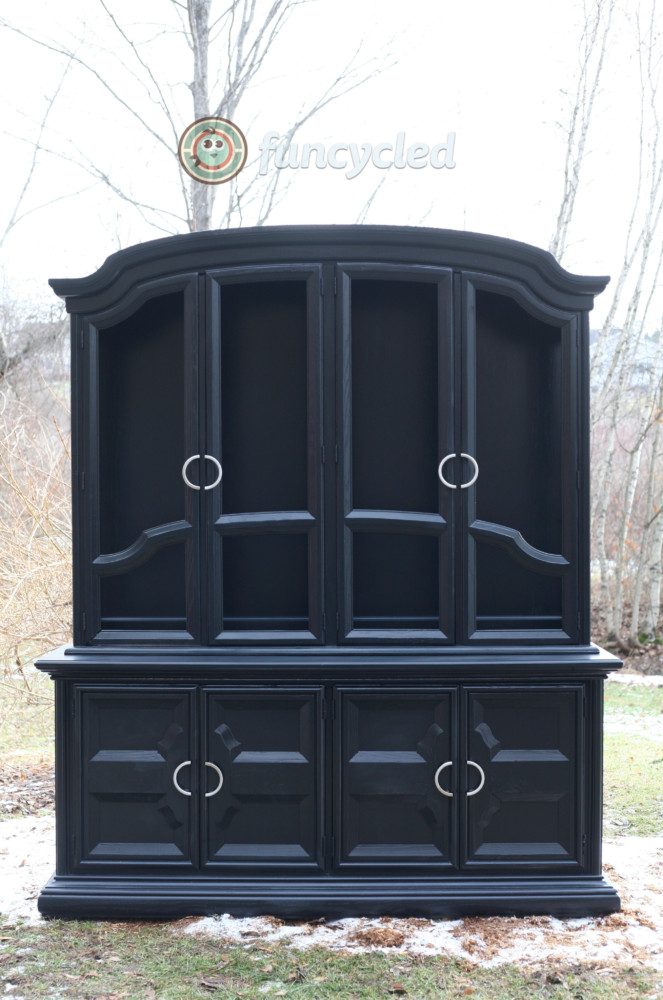
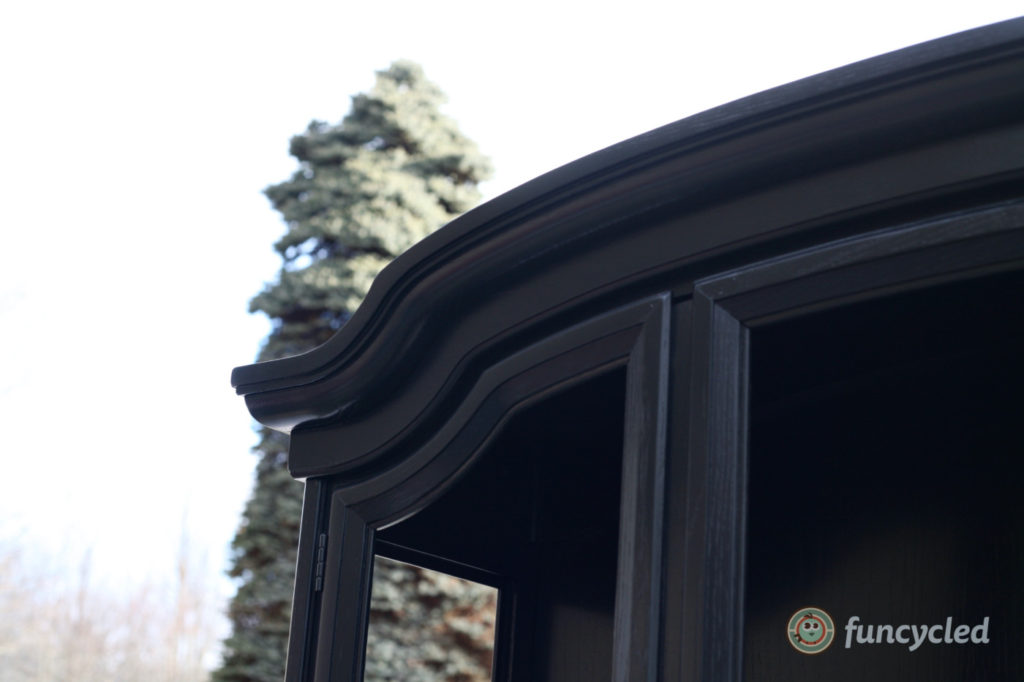
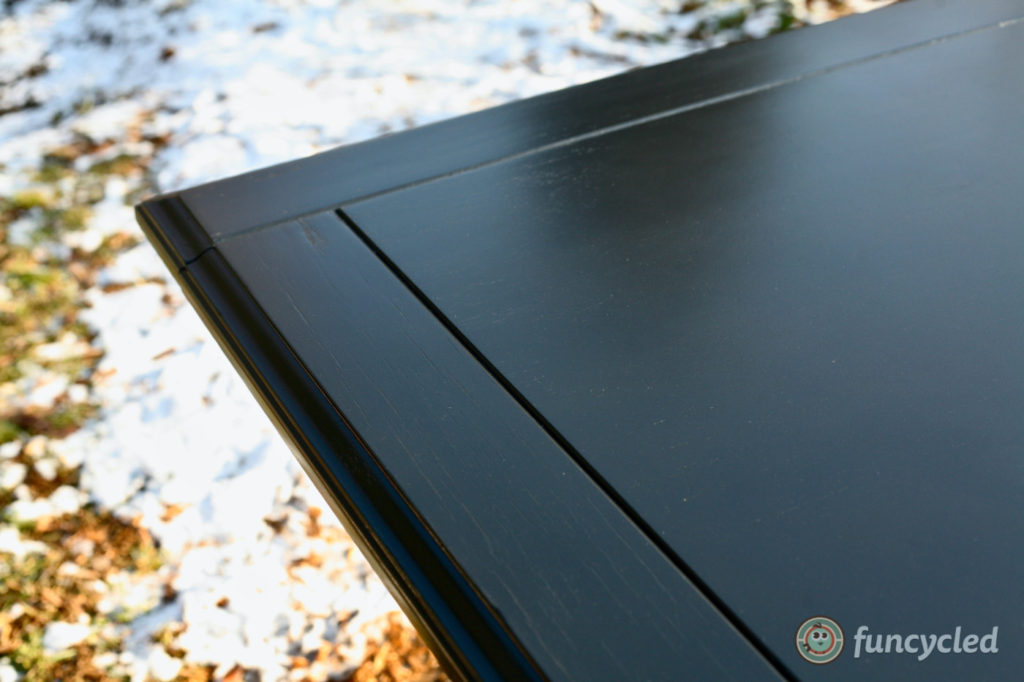
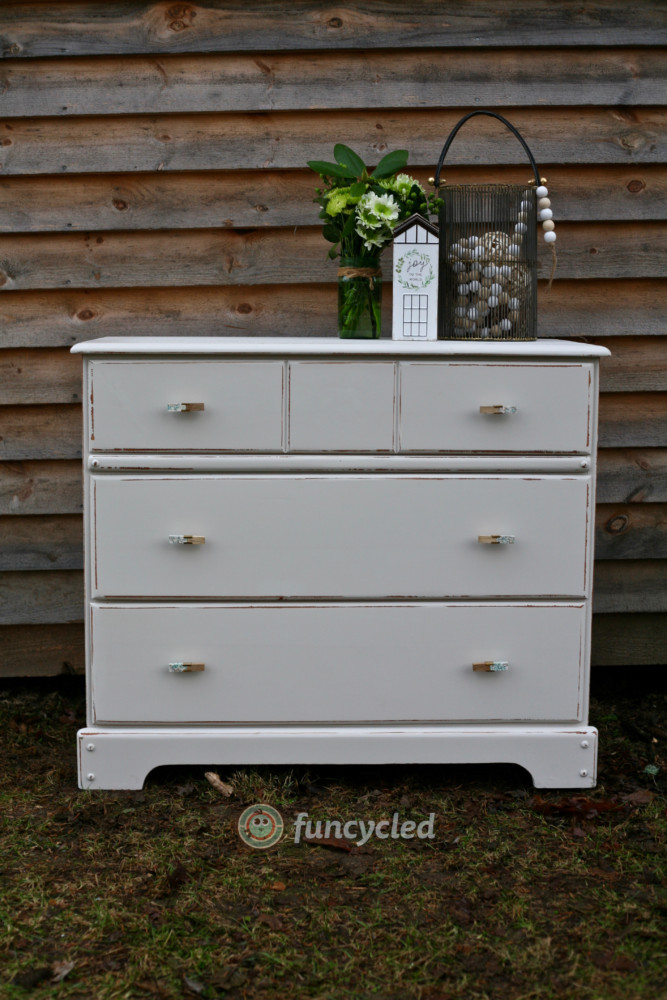
Painting it the dark gray gave me the deep base that I wanted to have show through. Then I used ACE hardware’s Metallic Silver Finish.
ace metalic finish
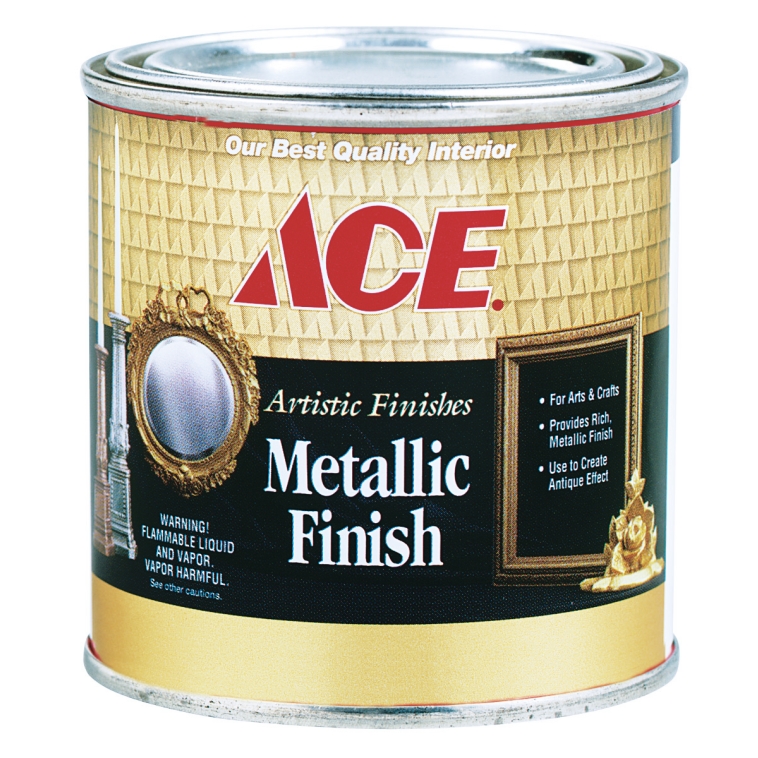
This is an oil based product so you’ll want to use it in a well ventilated area and use a paint brush you don’t mind throwing away after. I didn’t cover all of the surface with the silver. I left some of the gray popping through.  Make sure you only put a little bit of finish on your paint brush and almost dry brush it on. 08062015-12-mark_20379802905_o

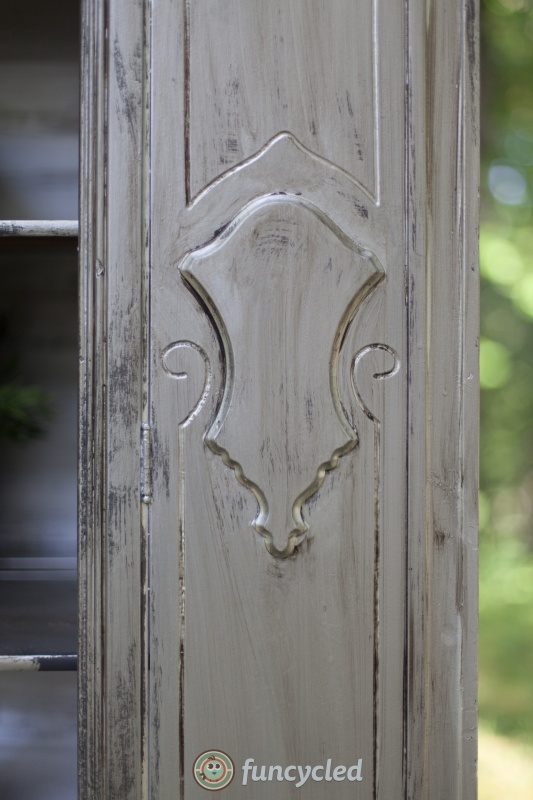
After I painted it with the metallic finish, it was a little too bright of a silver for me. So I used Valspar’s Antiquing glazing and whipped it all over the piece to tone it down a bit.  This is the photo I really wanted to show you the difference of… if only I didn’t treat my iphone like a pregnancy test. lol

valspar antiquing glaze

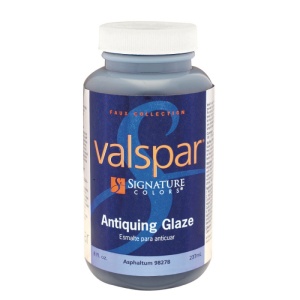
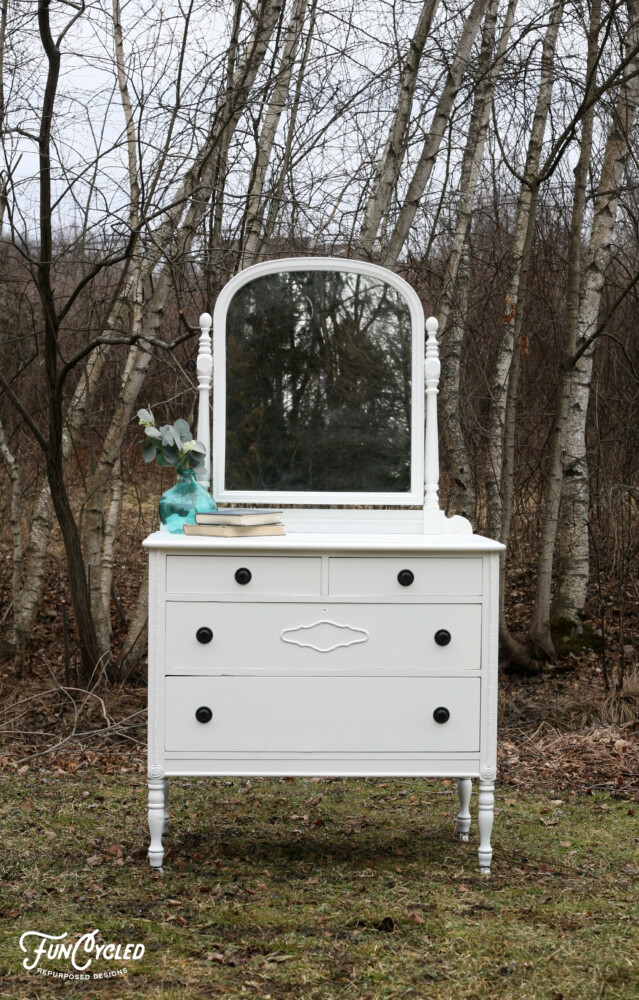
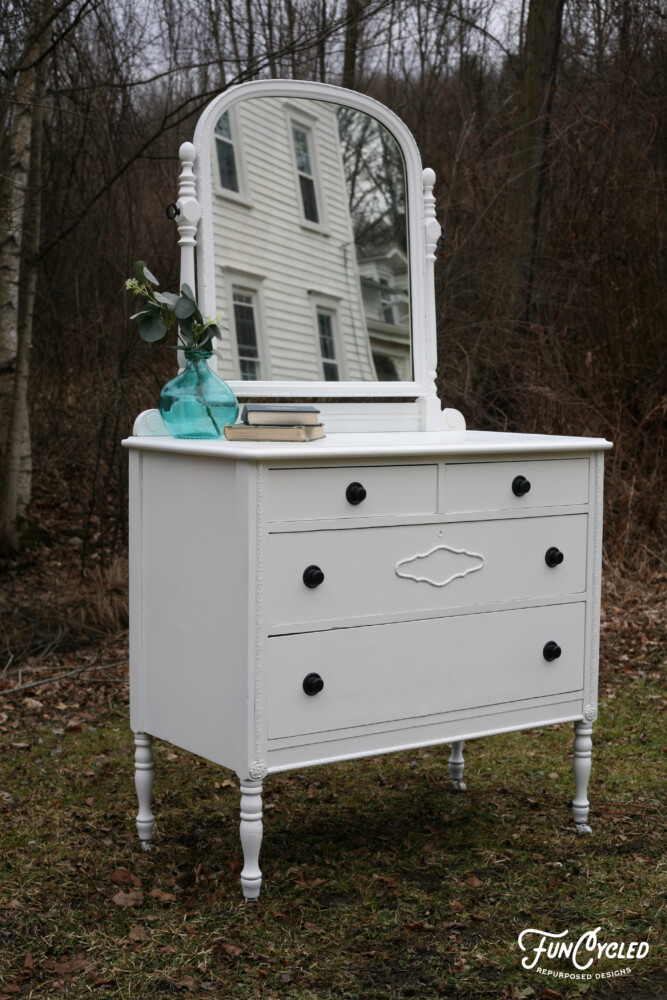
Here’s what the Valspar glaze looks like. Are you ready for the after pictures?
08062015-10-mark_20191774938_o08062015-7-mark_20371188062_o 08062015-13-mark_20191733020_o
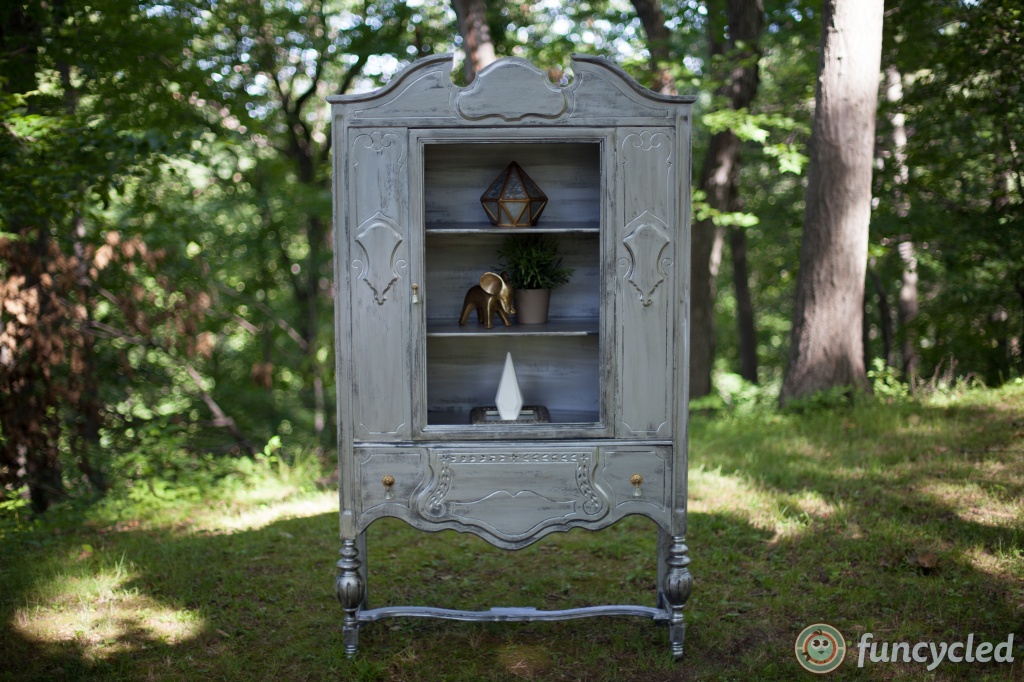
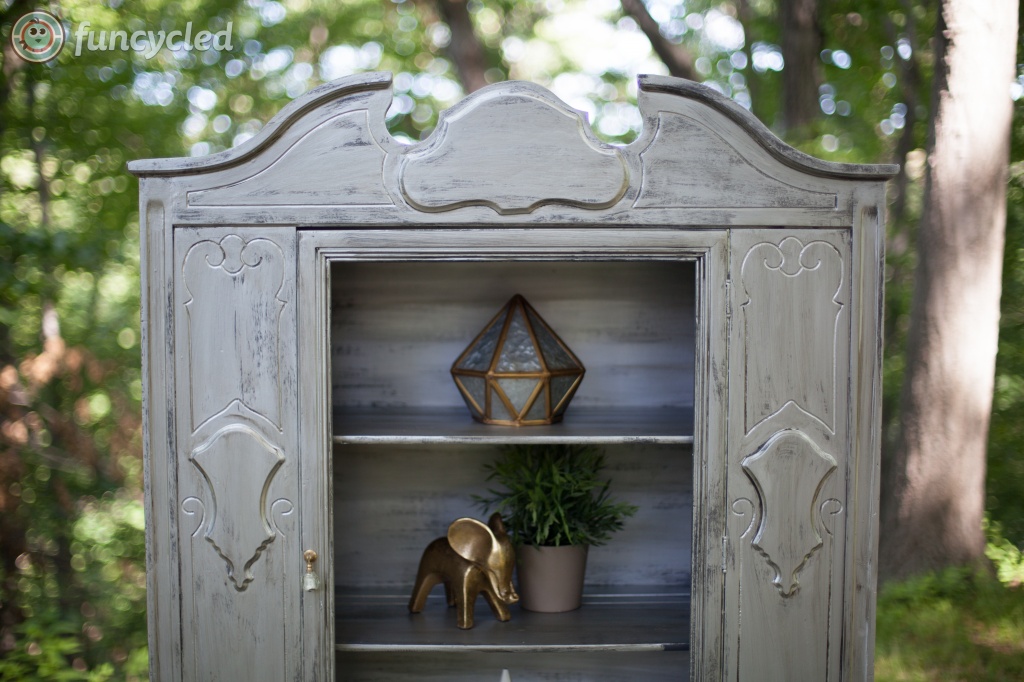
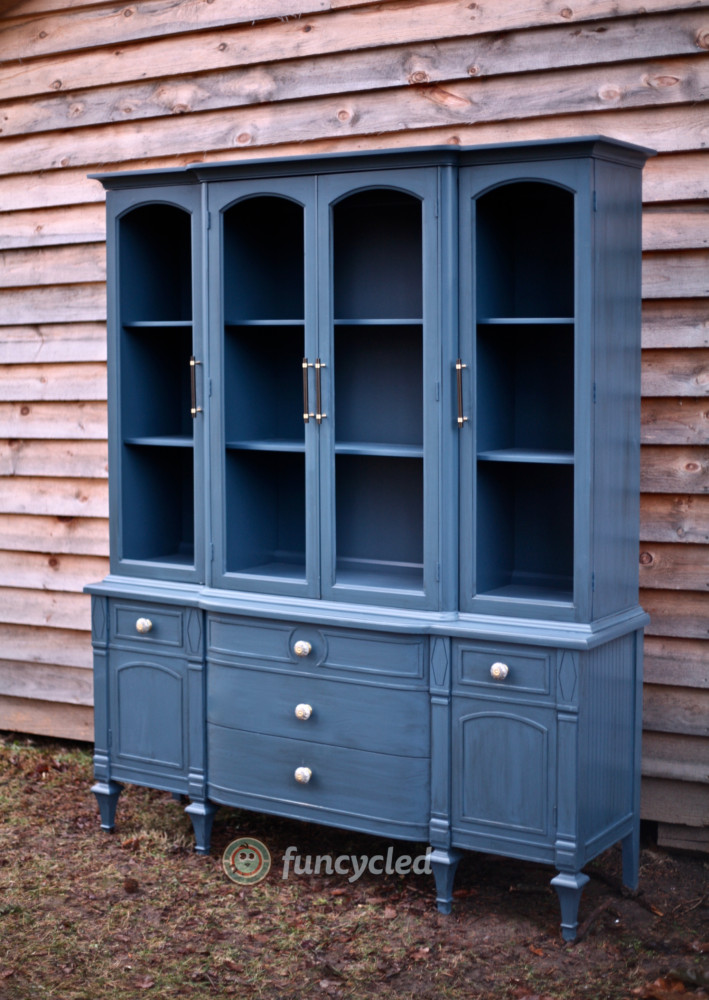
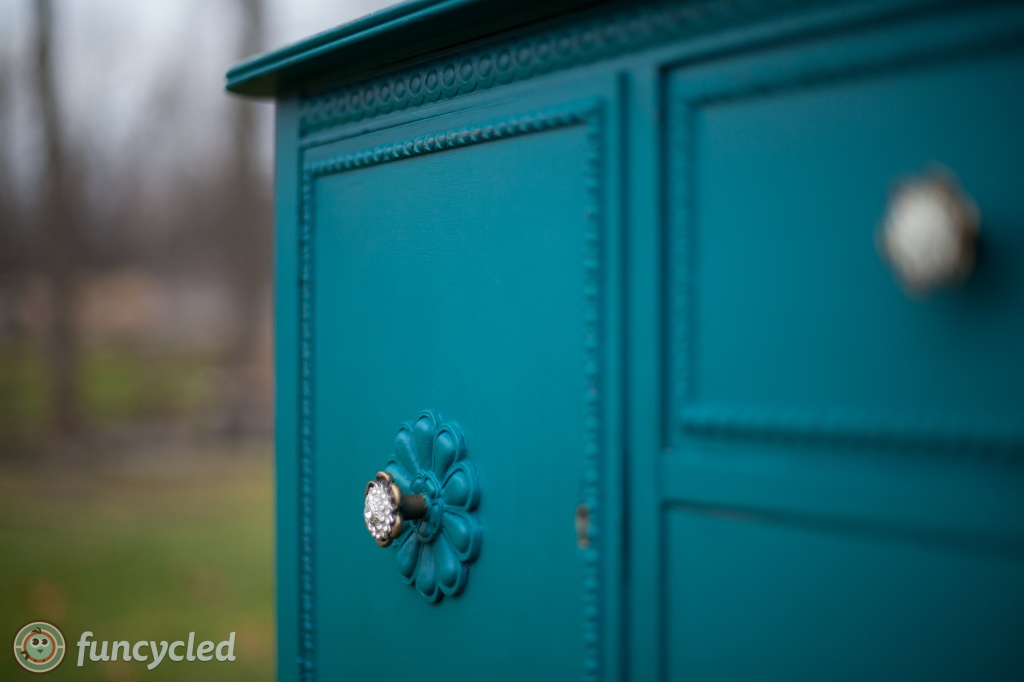
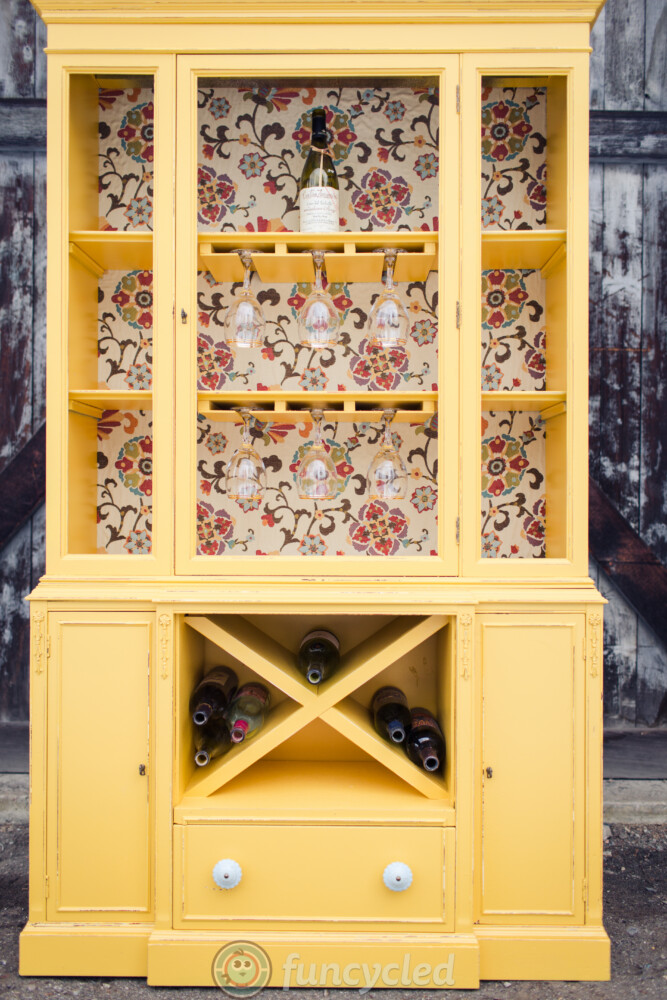
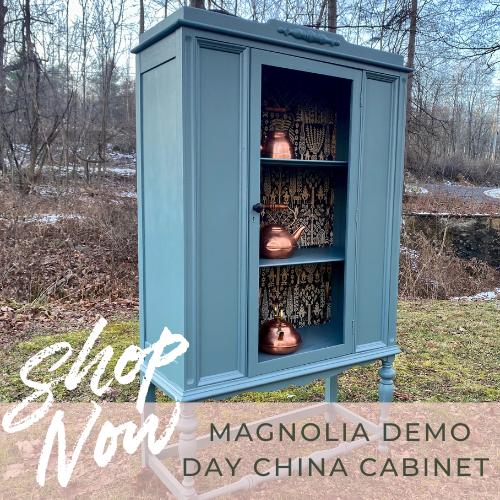
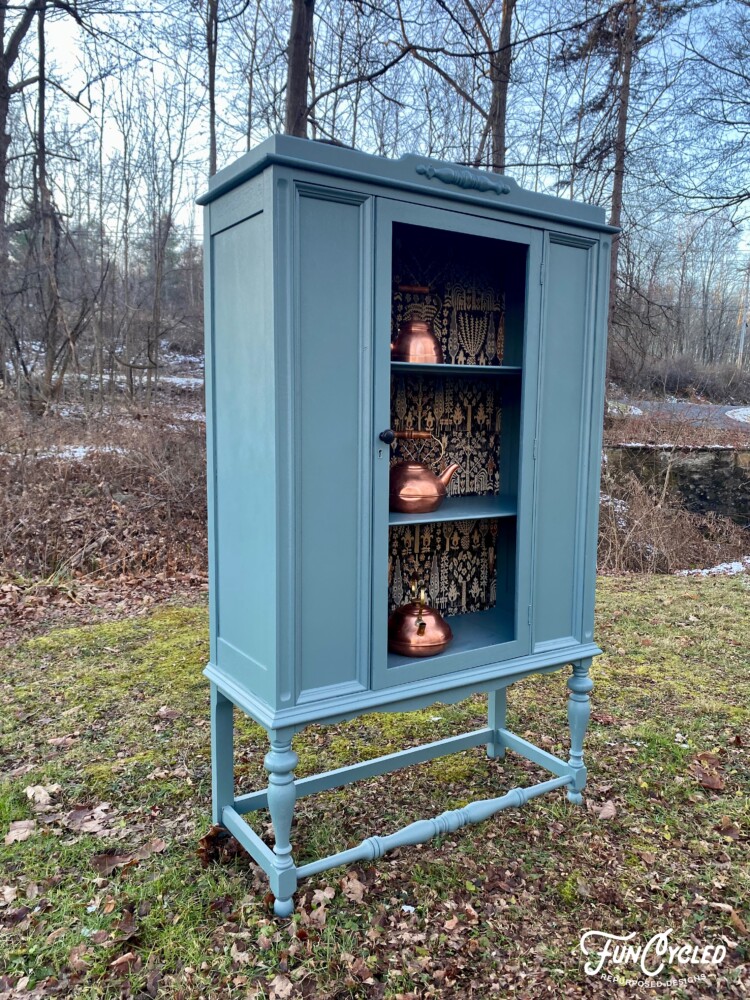
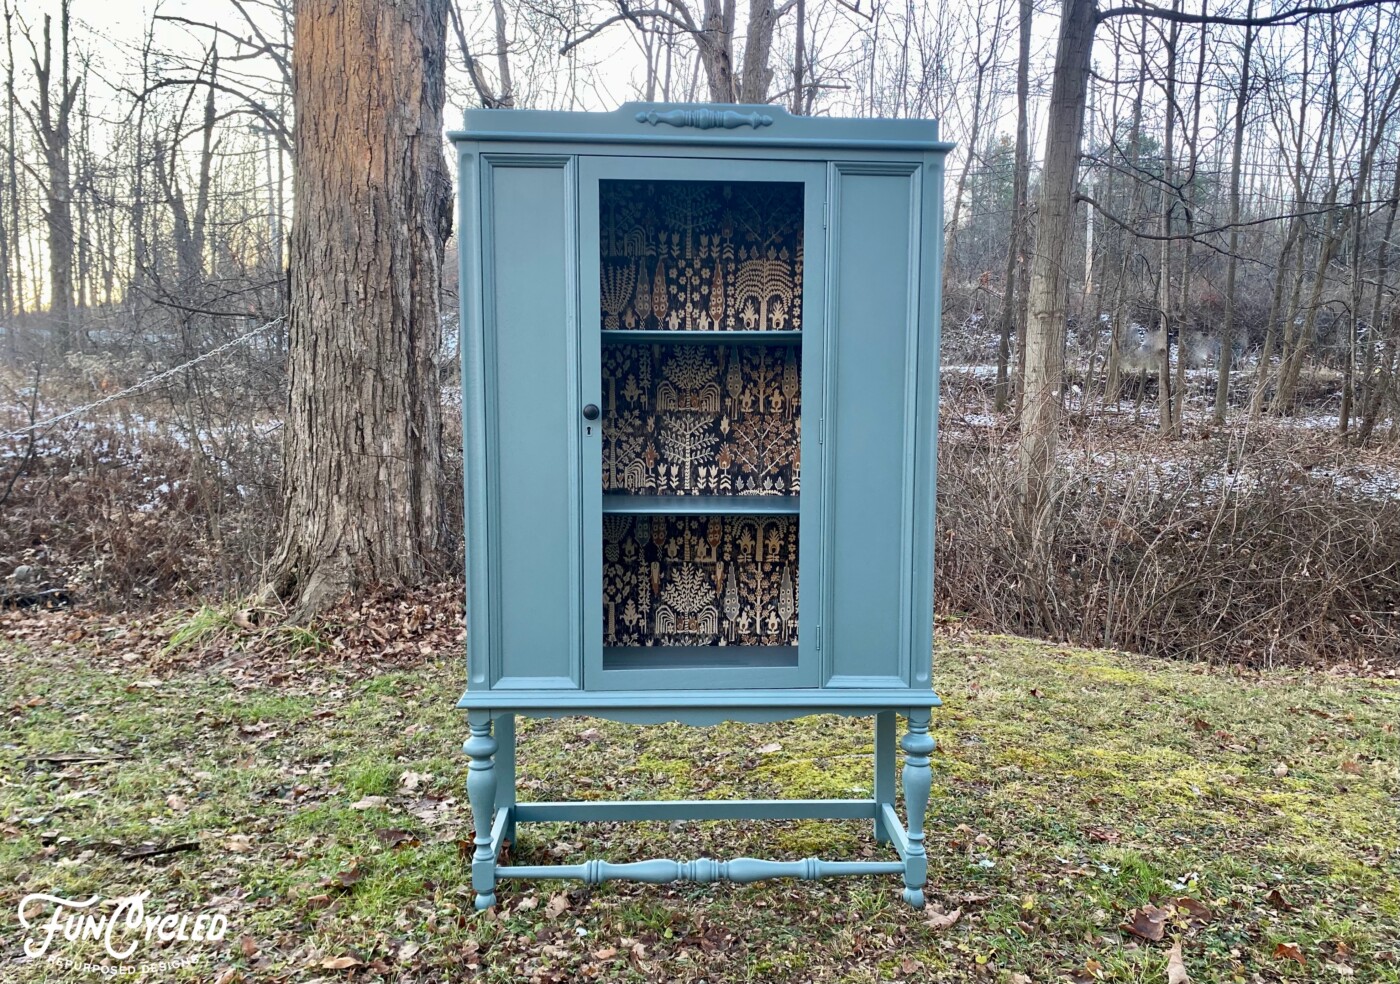
This china cabinet was a custom order. Andrea has gold and silver in her house, in such a tasteful way I might add! So, we used gold hardware on the cabinet and I adore the combination. I absolutely love this new finish! Thank you for letting me try out a new technique on your furniture, Andrea! You were a delight to work with.

Here’s a quick before and after for Pinterest if you’d like to pin it. ;)
BAA 1


Also remember to check out Furniture For Sale page for new pieces available! I’ll be adding a new mid century bedroom set soon!


There is a box at the top right of this page to enter your email address to receive notifications by email when I post something new on this blog. Please sign up today!

Happy FunCycling Friends,
Sarah ;)

If you like what you see, please like FunCycled’s Facebook page to keep up to date on the newest finds, vote on colors and give your input on our creativity. Last but not least, let us customize a furniture piece for you. We create custom furniture and will deliver for customers in upstate NY and also ship throughout the US. Send us a note with what you would like using our contact page. Or buy something that we’ve already designed from our furniture for sale page.


Posted on 18 Comments

How To Paint Furniture Like a Pro

Hi FunCycled Friends!!

Are you stopping by to see how to transform your furniture? We’re here to help you repurpose your furniture piece! Since painting has the same steps no matter what the piece, we’ve created this page to help everyone!

The steps that we take to repurpose furniture with a professional finish are below. If you’re looking to do it as a business or get a fine finish, we recommend getting a high end paint sprayer because that makes a huge difference in the finish.

If you’re looking to paint your own piece without making a business out of it, here are step by step instruction for you! ;)

Step 1 – Prep the Surface
The best paint job starts with the right prep work! Although there are some products designed to paint plastic, laminate, etc, the easiest to work with is solid wood or a wood veneer pieces. The others can be a bit tricky to paint. If the wood is glossy, you’ll want to sand it with 100-120 grit sand paper. We prefer to use an electric sander on all top surfaces and hand sand using a sanding block on the detailing. If it’s unfinished wood, ignore that step and head to step 2.

Step 2 – Repair 
Fill in any holes, scratches, etc, using wood filler and a putty knife. We use Gorilla All Purpose wood filler.

Let it completely dry (the dry time depends on the size of the holes). Sand the spots with the wood filler smooth. Also, remember if you are going to be replacing the knobs, take them out now and fill in the original holes so that you can drill new holes that are the correct size (unless they match exactly). If you have hardware on the piece that you like the look of but not the color, leave it on the piece and prime that, too. After it’s primed, remove it and use spray paint to paint it the color of your choice. Using the same hardware will save you a ton of money!

Step 3 – Clean It Well
Clean, clean, clean. Most likely if it’s been sitting around long enough to need a paint job, it needs a good cleaning. If you don’t clean the surface well, the paint won’t stick properly and you won’t get a nice smooth finish. There are plenty of different products out there and I am not married to just one. At the moment, I am using a vinegar and water mixture because I like things all natural as much as possible. I breath in enough chemicals as it is, thank you very much. :)

Step 4 – Bonding Primer
Time to prime! We use a water based primer and try to stick with Zinsser 1-2-3 Primer. You’ll want to look for the gallon that says it sticks to all surfaces without sanding.

We use this for a couple reason. It is less toxic than oil based primers and it is easier to clean up. Not to mention, it does an awesome job!!

You can apply all of your product with a brush, a foam roller, or an air sprayer. If you are doing this as a one time job, just use a foam brush and foam roller brush. I think it applies better than using a regular bristle brush. We use a commercial air sprayer which is a huge investment (it took us 4 years to buy the one we use). If you use an air sprayer to paint using latex paint, you will need to water it down to have it work correctly and not get spitting. See the user manual for your sprayer to find out the exact mixture needed.

Here’s a list of my favorites:
Brush
Roller Set
Foam Brush

Step 5 – Paint
Time to paint with the color of your choice.The same brush choice applies as in Step 4. We prefer Clark and Kensington or Benjamin Moore paint. As a tip – check out the “oops” section of your local hardware store to see if they have paint that has been returned. This will save you money if you can find the right color. As you begin to paint, make sure you do thin coats of paint so you don’t get dripping and uneven coverage. Always watch for drips. Drips love me and want to ruin my life! If you catch them quick, it’s much easier to fix.

Step 6
If you are going to be painting something that will be getting a lot of use (table top, dresser top), you will want to add a sealer to protect it. We have used Varathane Water Basic Clear Coat.

Step 7

This may feel like the hardest part! Wait, wait, wait. It’s best not to use a piece for 5-7 days and can take up to 30 days to completely cure. I know, I have cheated and put it in place earlier than that but it’s risky business. If you want to put it in the room and not touch it or put anything on it, that should be ok. Just enjoy it from a distance for a week, ok?

You can do it and if you try and can’t finish, shoot me an email I’ll try to help!
Here’s some of our favorite before and afters for you to enjoy:
baa3 baa4 baa2 BAA 1 baa5 baa10photo 3

photo 2 (2) photo 1 photo 2 (3) photo 1 (3)

Thank you all for following along! If you’d like to get this blog in your email once a week, please sign up for our weekly newsletter by adding your email in the little box below my picture.

Did you decide you’d like us to paint your furniture for you? Contact Us today!

If you’ve enjoyed this post, please like FunCycled on  FacebookInstagram and Pinterest if you don’t already. Keep up to date on the newest finds, vote on colors and give your input on our creativity. We share fun tutorials, great before and after, and new design inspirations.

We offer interior design, kitchen cabinet painting, and custom built tables, barn doors, and repurposed furniture. Thank you, again, for working with us and for taking the time to spread the word about what we do.

Happy FunCycling Friends,
Sarah ;)


Posted on

Professional Furniture Painting by FunCycled

Hi Friends,

Even though we’ve been in business for 9 years now, we still get asked if we will paint furniture that our clients own. The answer is yes! We have a professional grade air sprayer and can get a beautiful finish for your treasured furniture! This week’s Tuesday’s Treasures is a perfect example of that.

Joseph reached out to us to see if we could paint this buffet.

We were happy to help him with this project! We ended up painting the base Gray Shower 2125-30 by Benjamin Moore. Then we sanded and stained the top with classic gray by Minwax. Joseph wanted to keep the original hardware. Then we sprayed the whole piece with protective clear coat.

If you want to see how we paint furniture, check out our How to Paint Furniture post.

Ready for the after photos?

This was done as a custom order so it’s not for sale, but you can check out new pieces on our For Sale page:

Please sign up for our weekly newsletter by adding your email in the little box below my picture. 

Happy FunCycling Friends,
Sarah ;)

If you like what you see, please like FunCycled’s Facebook page to keep up to date on the newest finds, vote on colors and give your input on our creativity. We also offer interior design, kitchen cabinet painting, and custom built tables, barn doors, and furniture. We can deliver for customers in upstate NY and also help you ship throughout the US. Send us a note with what you would like using our contact pageOr buy something that we’ve already designed from our online shop.

Posted on 2 Comments

Dining Room Transformation by Painting the Furniture

Hi Friends,

How’s your week going? I hope all is well and you’re staying warm in the northeast with this chilly weather. Our brand new furnace broke down this weekend and no furnace company was available that we called for help. So, John called the manufacturer, went to the wholesaler to buy a part, watched YouTube to learn how to fix it, and in the end saved us a couple hundred dollars I’m sure! The best part? We were warm that same day! He’s one handy guy to have around.

We also started the kids bathroom remodel. We’re only in the gutting stage right now, but I thought I’d share it anyway.

Before:

Now:

There was no way to make a tub fit into the space without it sitting in the window so we expanded the bathroom out a couple of feet. We also found beautiful hard wood floors beneath the plywood and linoleum. Yay!

For this week transformation, I wanted to show you how a customer changed the whole look of her dining room by repurposing the furniture she already had and buying new dinging room chairs.

Here’s the set before:

Katherine knew that she wanted it painted a glossy black for a much more modern look! She wanted a lacquer finish, but I don’t like working with lacquer because of how toxic it is. We went with a black enamel and a gloss clear coat to get a very similar finish without as many chemicals.

Here are the pieces painted before they were delivered:

Black Enamel Hutch Makeover
Black Enamel with Gloss Clear Coat over Oak Table
Black Enamel Table Makeover
Close up of oak table with black enamel and gloss clear coat.

Finishing the pieces made me really excited to see how they’d look in the space. Notice that Kathleen didn’t change much out other than the chairs and the centerpiece and it completely transformed the room!

This set was a custom order, but you can check out even more new pieces on our For Sale page.

Please sign up for our weekly newsletter by adding your email in the little box below my picture. 

Happy FunCycling Friends,
Sarah ;)

If you like what you see, please like FunCycled’s Facebook page to keep up to date on the newest finds, vote on colors and give your input on our creativity. We also offer interior design, kitchen cabinet painting, and custom built tables, barn doors, and furniture. We can deliver for customers in upstate NY and also help you ship throughout the US. Send us a note with what you would like using our contact pageOr buy something that we’ve already designed from our online shop.

Posted on 1 Comment

FunCycled Furniture Painting Classes in the Capital District

Hi Friends!!!

A highly anticipated time has come! We have partnered with the Art Center of the Capital Region to offer classes on how to paint your own furniture. This is such an exciting announcement for us!! I’ve considered myself an artist above all else in this business! I’ve been painting since I was a teenager. I was home schooled and my parents invested in having me go to an amazing art teacher to learn how to paint for years.  I had art in galleries and loved everything about it. Then I started enjoying interior design and painting furniture. The rest is history! ;)

This class will be 3 hours long. You’ll bring your own piece (anything small that you can carry through a door by yourself) and we will paint it completely and distress it if you’d like, during that time period. I’ll show you painting techniques that I’ve learned over the last 4 years of re-purposing furniture full time. Bring your friends and make it a night (or morning) outing! You can see a full list of class dates and register for them here: Repainting to Repurpose with FunCycled

Here’s some examples of furniture finishes you’ll be taught in the class!
12-04-2015-2-mark_23422090322_o 10-21-2015-8-mark_22180282410_o 09-10-2015-29-mark_20679412874_o 08-27-2015-18-mark_20743379439_o
T
his class would make a great gift for a friend or loved one! If you have friends that love DIY or paint and sip classes, this should be the next outing for your fun night out!

Won’t it be fun to give new life and add character to your favorite piece of furniture? Thank you for appreciating art and supporting our local community!

There is a box at the top right of this page to enter your email address to receive notifications by email when I post something new on this blog. Please sign up today!

Happy FunCycling Friends,
Sarah ;)

If you like what you see, please like FunCycled’s Facebook page to keep up to date on the newest finds, vote on colors and give your input on our creativity. Last but not least, let us customize a furniture piece for you. We create custom furniture and will deliver for customers in upstate NY and also ship throughout the US. Send us a note with what you would like using our contact page. Or buy something that we’ve already designed from our furniture for sale page.

Posted on

Interior Design, Interior Painting Project and Custom Furniture

Often when we go to clients’  homes to deliver furniture or when we meet new people, they will ask what our business is. When we tell them refinishing and painting furniture, color consults, design and interior painting. They are usually surprised, especially about the interior painting and design. Most people know about the furniture, but I don’t often get to share the “afters” of our interior painting projects.

Well, here is one of the interior painting and design projects that we did for our church a few months ago. I’m glad I finally took time to post about it because it was a fun project and shows how “funcycling” can be so much more than furniture makeovers!  We worked with my friend Kim (who goes to my church and was given the design job) to pick out decor, paint colors, furniture finishes, and room design/layout. We also ordered furniture that we didn’t have – like couches and chairs, and rugs. It was sooo much fun to turn empty. lackluster rooms into beautiful, welcoming places for visitors and church members alike.

First we picked out the paint colors for the family room. It’s called a family room because it is a place for families to go sit with their kids and listen to the sermon. Sometimes when parents aren’t comfortable  putting their toddlers/babies in nursery yet, or they have a talker or crier who might distract other people – it is a great room to retreat to. The sermon is played live in that room so people can hear the whole thing.

We wanted the seating to be comfortable but easy to clean. So we went with leather chairs and a couch from Overstock.com. Very cost effective and surprisingly comfortable. We painted the one large wall Benjamin Moore’s Majestic Blue and the other three walls Benjamin Moore’s Carlisle Cream.
2014-07-14_0028 2014-07-14_0029

We painted this cabinet with the same color Majestic Blue. When you paint furniture with the same paint that you use on the wall, it almost always looks one hue lighter which makes it blend well in the room without being too matchy matchy.

2014-07-14_0033 Continue reading Interior Design, Interior Painting Project and Custom Furniture

Posted on Leave a comment

Flipped Furniture Frenzy!

Hi Friends!

If you follow us on social media, you probably know that FunCycled has been generating some really great furniture flips recently, and the best part…EVERYTHING you see here is IN STOCK!! But what you might not know is that furniture flipping is how FunCycled first began!! Join me down memory lane and also to get a full overview of our current inventory, plus our latest Featured Furniture Collection.

If you are having trouble viewing images, click here.

Memory Lane

In 2012, my husband John and I saw an opportunity to share our passion and know how for furniture flipping! I have always been creative, and I found this creativity to really take flight when I found moments to restore something broken or unused by refreshing it, repurposing it, and transforming into a new treasure! Check out some pics from back in the day!

Current Pieces

From this painted and stained buffet to vintage storage trunks (great for coffee tables or toy corralling!) to end tables and night stands, FunCycled has some amazing pieces in our inventory! Take a look! Be sure to click on each image to get full details. BTW, the cutie black end stand with gold legs is a set of two! Can you stand it?!

If you see a treasure that would be perfect for your space, reach out to me on our Contact Us page or you can email me directly and let me know what piece you would like!

Featured Collection

This collection comes with a larger piece which could be used as a dresser or even a buffet or sideboard as well as two side tables for night stands or even end tables for a living room! Also check out that before photo!

Check out some close ups and details of this collection! The double stripe and black and gold hardware add a touch of flair and I can’t get over how much I love the retractable doors the open to additional storage! LOVE!!

Each piece has been painted in Benjamin Moore’s Steam and stained with a mix of gray and brown stains that I had on hand–sometimes that just the perfect shade!

Again, if you see a piece (or more!) that you would like for your home, reach out to me on our Contact Us page.

Want some helpful tips on how to complete your own furniture flip, check out this how-to blog: HOW TO PAINT FURNITURE LIKE A PRO!

DON’T FORGET

FUNCYCLED IS SPONSORING OUR UPCYCLING CONTEST! (Click the image below for more details.)

Earth Day 2024

Thank you all for following along! If you’d like to get this blog in your email once a week, please sign up for our weekly newsletter by adding your email in the little box below my picture. 

If you’ve enjoyed this post, please like FunCycled on  FacebookInstagram and Pinterest if you don’t already. Keep up to date on the newest finds, vote on colors and give your input on our creativity. We share fun tutorials, great before and after, and new design inspirations. 

We offer interior design, kitchen cabinet painting, and custom built tables, barn doors, and repurposed furniture. Thank you, again, for working with us and for taking the time to spread the word about what we do. 

Happy FunCycling Friends,

Sarah ; )

Posted on

Demo Day by Magnolia Painted China Cabinet for Sale

Hi Friends!

How was your weekend? We enjoyed so many holiday festivities over the weekend! From a Christmas Jazz concert in Saratoga to lights in Washington County Fairgrounds. It was so nice to celebrate and enjoy with my family!

If you have trouble seeing the photos in this post, click here.

For this week’s makeover, I wanted to share a china cabinet makeover that we just finished and added to our online shop! You can purchase it today and have it delivered by Christmas!

Here’s the china cabinet when I bought it to rescue it:

We painted this piece with Magnolia’s paint line with their color Demo Day, installed wallpaper to the back panel on the inside, and added new hardware. This piece still has the glass on the front door, we just removed it for photos so you can see the inside better.

If you want to see how we paint furniture, check out our How to Paint Furniture post. 
Here are the after photos for you:

This piece is available to purchase, but be sure to visit our SHOP page to check out what other pieces we have available for purchase or custom order. 

Or contact us to get a quote to let us redo your furniture for you! 

Thank you all for following along! If you’d like to get this blog in your email once a week, please sign up for our weekly newsletter by adding your email in the little box below my picture. 

If you’ve enjoyed this post, please like FunCycled on  FacebookInstagram and Pinterest if you don’t already. Keep up to date on the newest finds, vote on colors and give your input on our creativity. We share fun tutorials, great before and after, and new design inspirations. 

We offer interior design, kitchen cabinet painting, and custom built tables, barn doors, and repurposed furniture. Thank you, again, for working with us and for taking the time to spread the word about what we do. 

Happy FunCycling Friends,
Sarah ;)

Posted on

Painting a Pictograph Buffet – Tuesday’s Treasures

Hi Friends!

Why would we redo a newer piece of furniture? Well, even if furniture isn’t old, if it doesn’t work stylistically anymore, I’d rather have a client redo it instead of just buying new piece whenever possible. This is a perfect example of that!

Here’s the credenza before:

Pretty, but not quite the look our clients wanted so we sprayed the whole piece!

Box Color: Benjamin Moore Black

If you want to see how we paint furniture, check out our How to Paint Furniture post. 

Here’s a couple more photos of the afters:

This dresser isn’t available to purchase on our shop page because it was done as a custom order. Be sure to visit our SHOP page to check out what other pieces we have available for purchase or custom order. 

Or contact us to get a quote to let us redo your furniture for you! 

Thank you all for following along! If you’d like to get this blog in your email once a week, please sign up for our weekly newsletter by adding your email in the little box below my picture. 

If you’ve enjoyed this post, please like FunCycled on  FacebookInstagram and Pinterest if you don’t already. Keep up to date on the newest finds, vote on colors and give your input on our creativity. We share fun tutorials, great before and after, and new design inspirations. 

We offer interior design, kitchen cabinet painting, and custom built tables, barn doors, and repurposed furniture. Thank you, again, for working with us and for taking the time to spread the word about what we do. 

Happy FunCycling Friends,
Sarah ;)

Posted on

Antique Mirrored Dresser Painted White- Tuesday’s Treasures

Hi Friends!

I hope you had a beautiful weekend! If you didn’t see it already, I’m planing to do 40 new experiences in the that I turn 40, and I’m sharing the adventures along the way! The next one to check off the list; luxury sheets! I asked for luxury sheets for Christmas, and my friend Jo Ann bought them for me!

They are so silky and soft and I love them! You could get a pair here!

For this week’s furniture makeover, check out this adorable mirrored dresser makeover.

Here’s the dresser before:

It definitely could use an update! So we smoothed out any imperfections, primed and painted it Benjamin Moore’s color Simply White. We also added new hardware and sprayed it with a protective clear coat.

If you want to see how we paint furniture, check out our How to Paint Furniture post. 

Ready for the afters?

This set was done as a custom order so it’s not for sale, but I still wanted to share the transformation. Be sure to visit our SHOP page to see what pieces we do have available for purchase. Or contact us to get a quote to let us redo your furniture for you!

Thank you all for following along! If you’d like to get this blog in your email once a week, please sign up for our weekly newsletter by adding your email in the little box below my picture. 

If you’ve enjoyed this post, please like FunCycled on  FacebookInstagram and Pinterest if you don’t already. Keep up to date on the newest finds, vote on colors and give your input on our creativity. We share fun tutorials, great before and after, and new design inspirations. 

We offer interior design, kitchen cabinet painting, and custom built tables, barn doors, and repurposed furniture. Thank you, again, for working with us and for taking the time to spread the word about what we do. 

Happy FunCycling Friends,
Sarah ;)